Project Summary
- This project is a college application tracker with the ability for each user to create a new account and track their own, unique collection of college applications in order to improve organization and efficiency.
Collections
Blog Python Model code and SQLite Database:
-
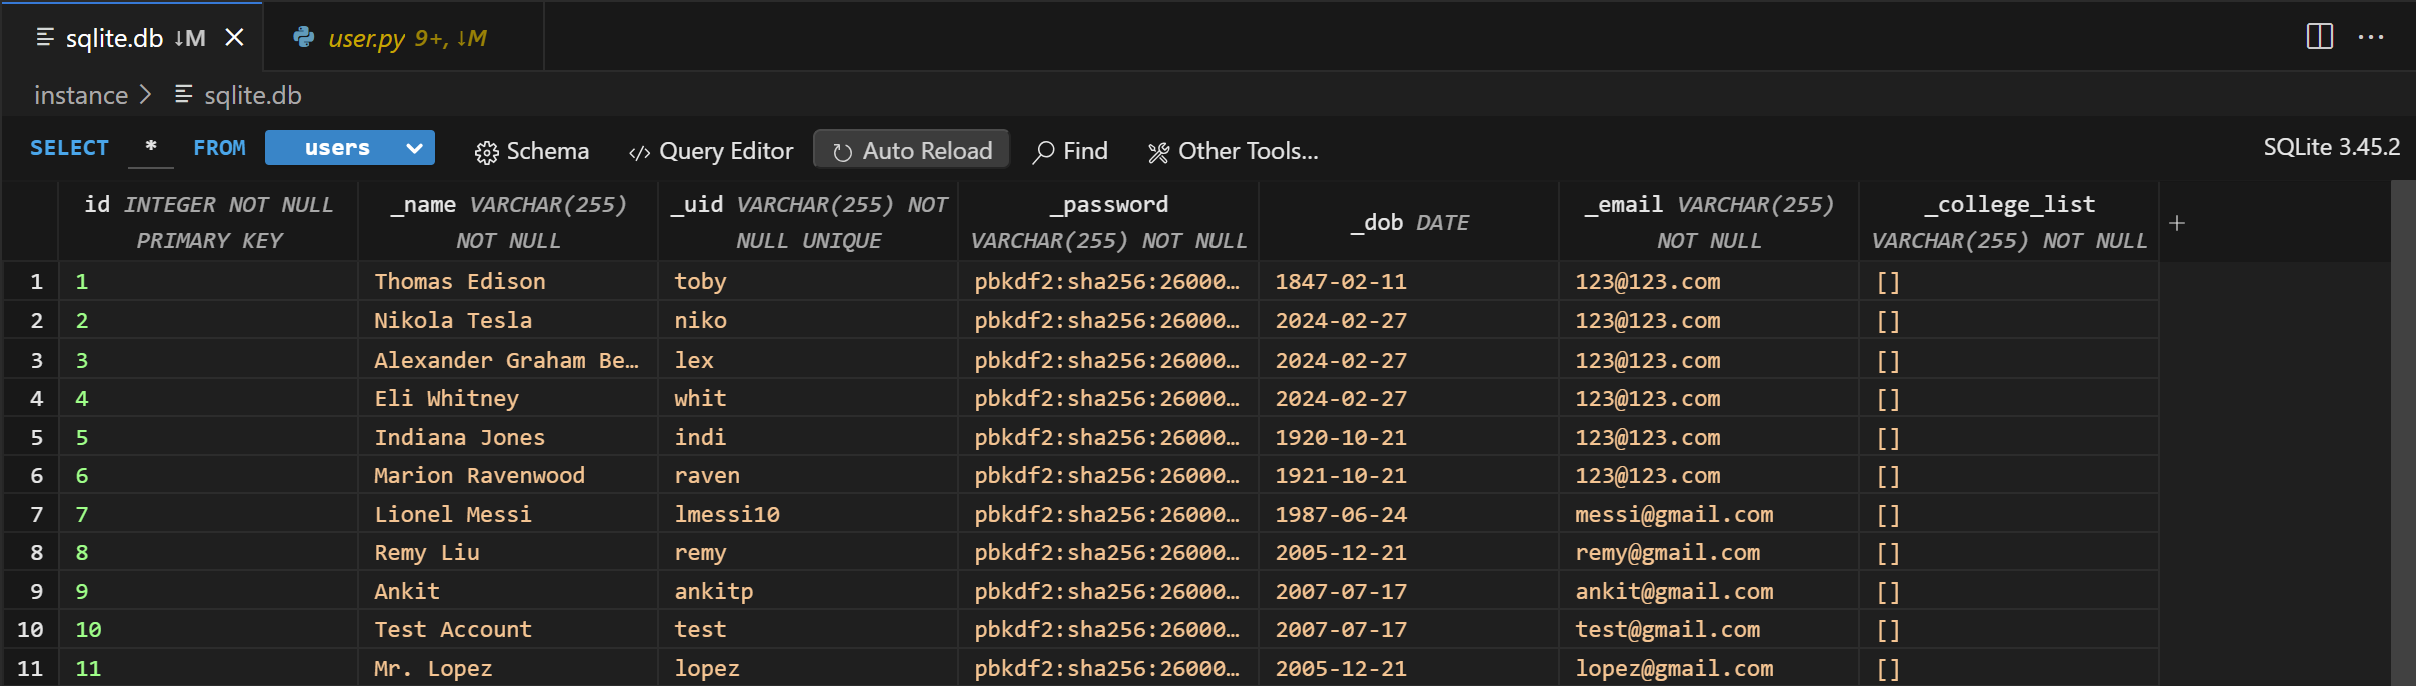
From VSCode using SQLite3 Editor, show your unique collection/table in database, display rows and columns in the table of the SQLite database.
-
From VSCode model, show your unique code that was created to initialize table and create test data.
.png)
.png)
-
As seen, parameters such as the name of the user, the UID, the confidential password, the date of birth, the email, and the unique college list are stored in the SQLite databse in the backend. The following images show the code for initializing the database by creating named parameter columns and assigning specific data to each column.
Lists and Dictionaries
Blog Python API code and use of List and Dictionaries:
-
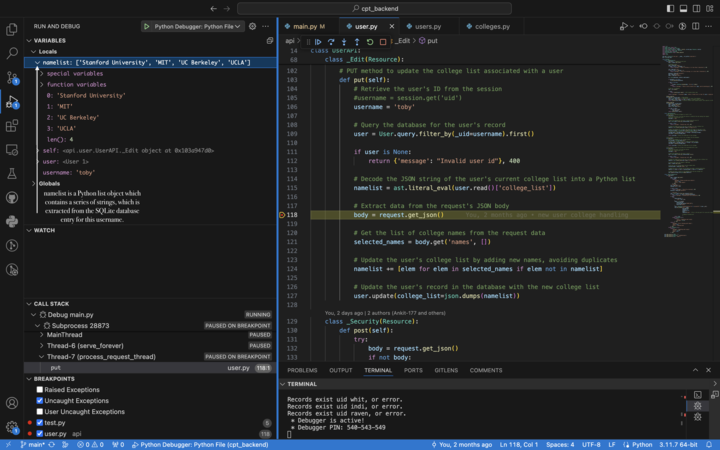
In VSCode using Debugger, show a list as extracted from database as Python objects.
- In VSCode use Debugger and list, show two distinct examples of dictionaries, show Keys/Values using debugger.

- This shows the JSON request that obtains a specific user’s college list. Here,
nameListis a Python list object that contains a series of strings, which is extracted from the SQLite database entry. In this case, it is for the user withuid“toby”.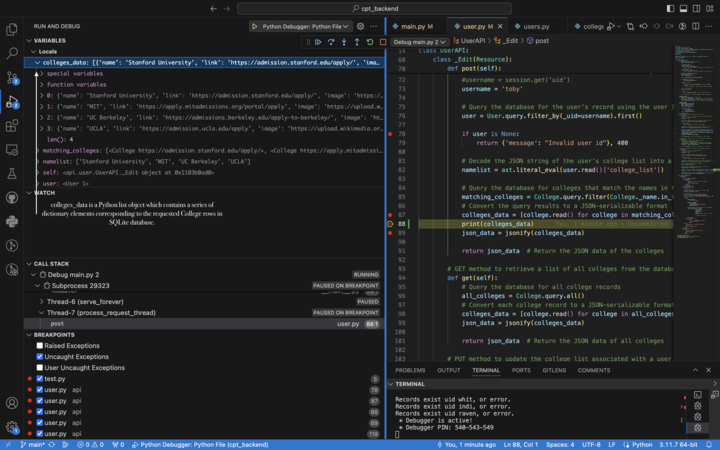
- Here,
colleges_datais a Python list object that contains a series of dictionary elements corresponding to the requestedcollege_listrow in the SQLite database. In this case, we are specifically viewing the data corresponding to the user “toby” once again.
APIs and JSON
Blog Python API code and use of Postman to request and respond with JSON.
-
In VSCode, show Python API code definition for request and response using GET, POST, UPDATE methods. Discuss algorithmic condition used to direct request to appropriate Python method based on request method.
-
In order to be directed to the correct API endpoint (
users/edit,users/authenticate,/users), one must use correct the prefix for the port (8086) and the correct link in order to access and be directed to each APIs request. These requests can include the GET, POST, or PUT methods (or even all 3) depending on the capabilities of that specific API endpoint. - GET code:
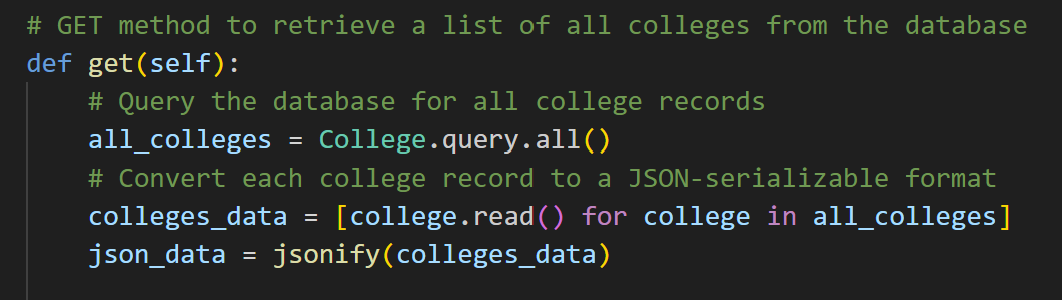
- As seen in this code, the GET method is used to retrieve college data from the database.

-
As seen in this code, the GET method is used to retrieve the list of users from the database in order to validate login attempts.
- POST code:
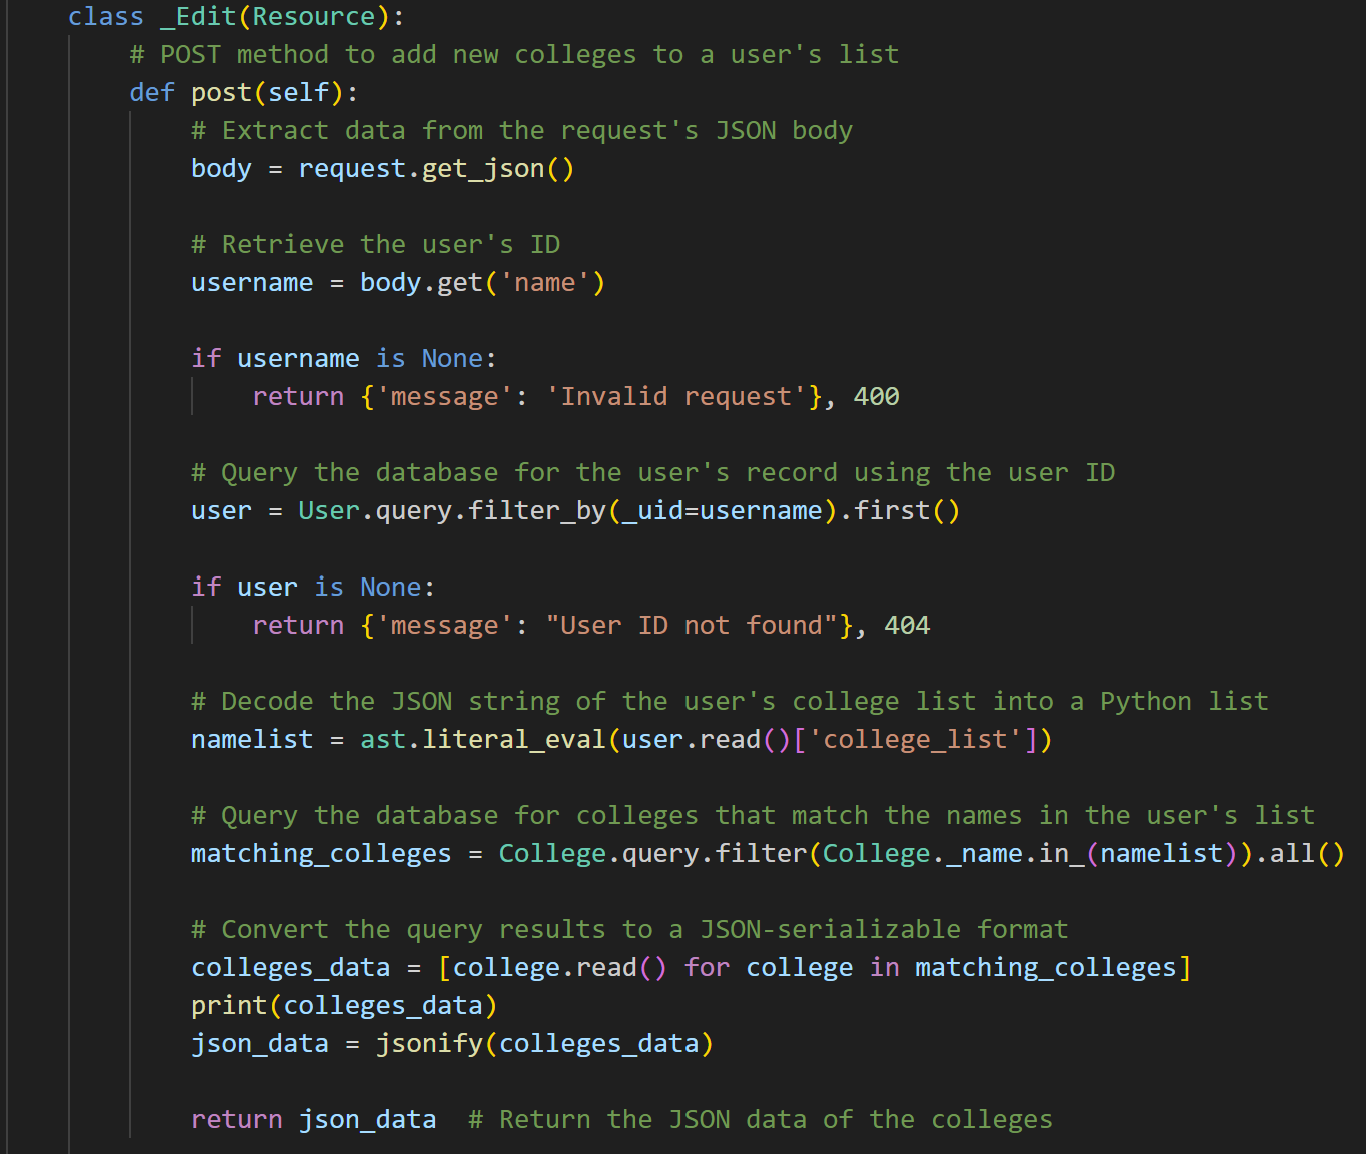
-
As seen in this code, the user provides the input of a college list, which is converted to a Python list and saved to the backend database using the POST method.
- PUT code:
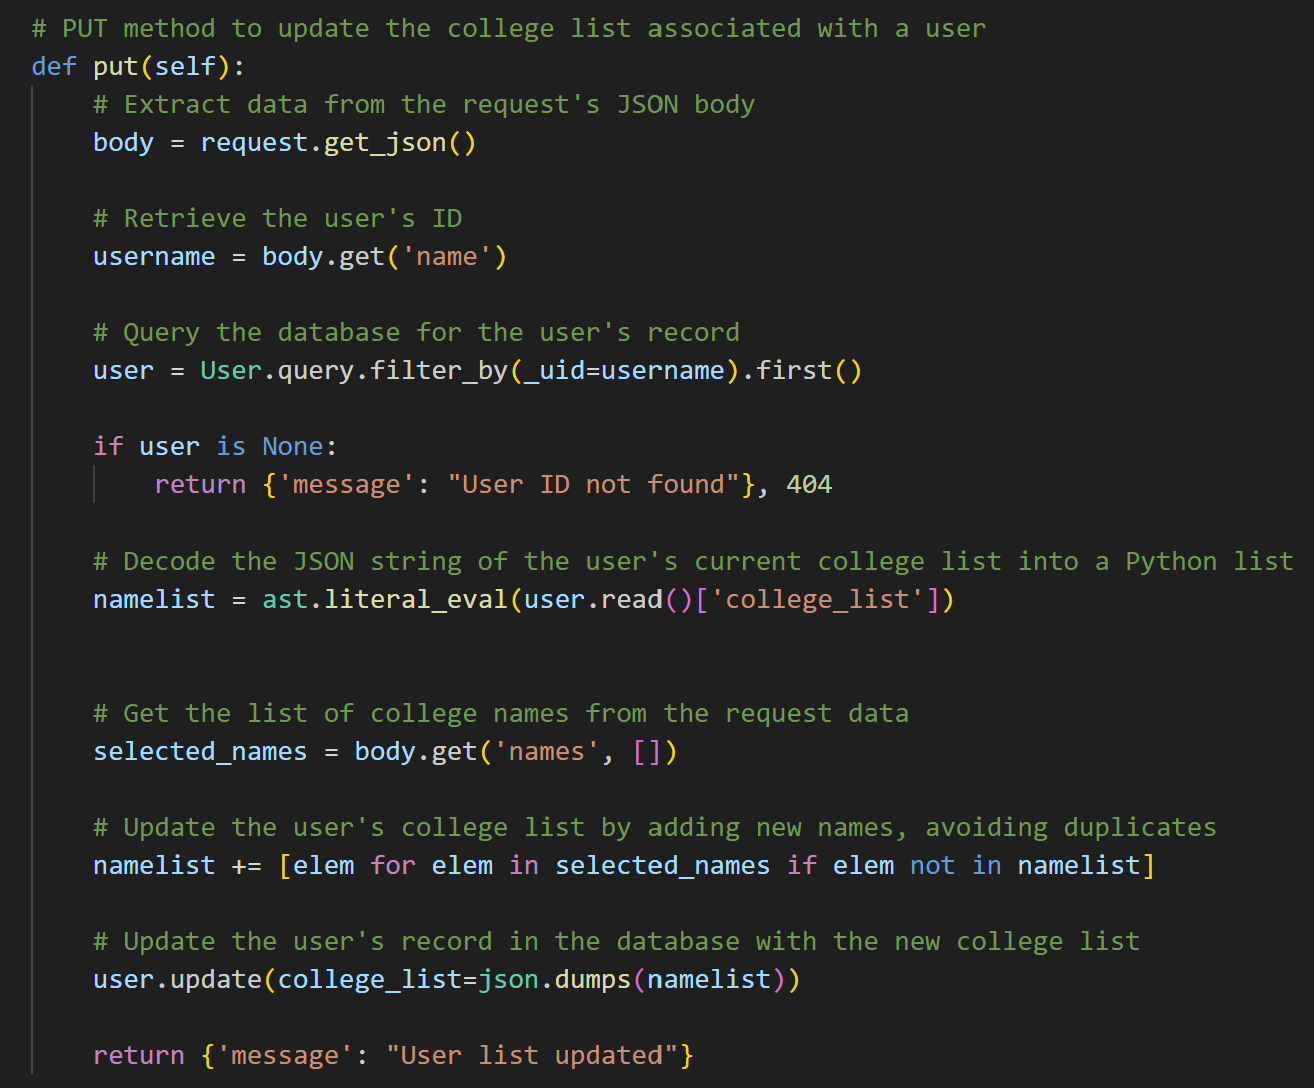
-
As seen in this code, a user can update their college list while avoiding the addition of duplicates using the PUT method.
- In VSCode, show algorithmic conditions used to validate data on a POST condition.

-
This is just one of the many examples of algorithmic conditions in our code in order to validate inputs and create conditions for success and failure of certain functions. In this example, parameters such as the name, username, date of birth, and password are checked for validity during account creation. Account creation is done using a POST method.
-
In Postman, show URL request and Body requirements for GET, POST, and UPDATE methods.
-
In Postman, show the JSON response data for 200 success conditions on GET, POST, and UPDATE methods.
- GET method in Postman:
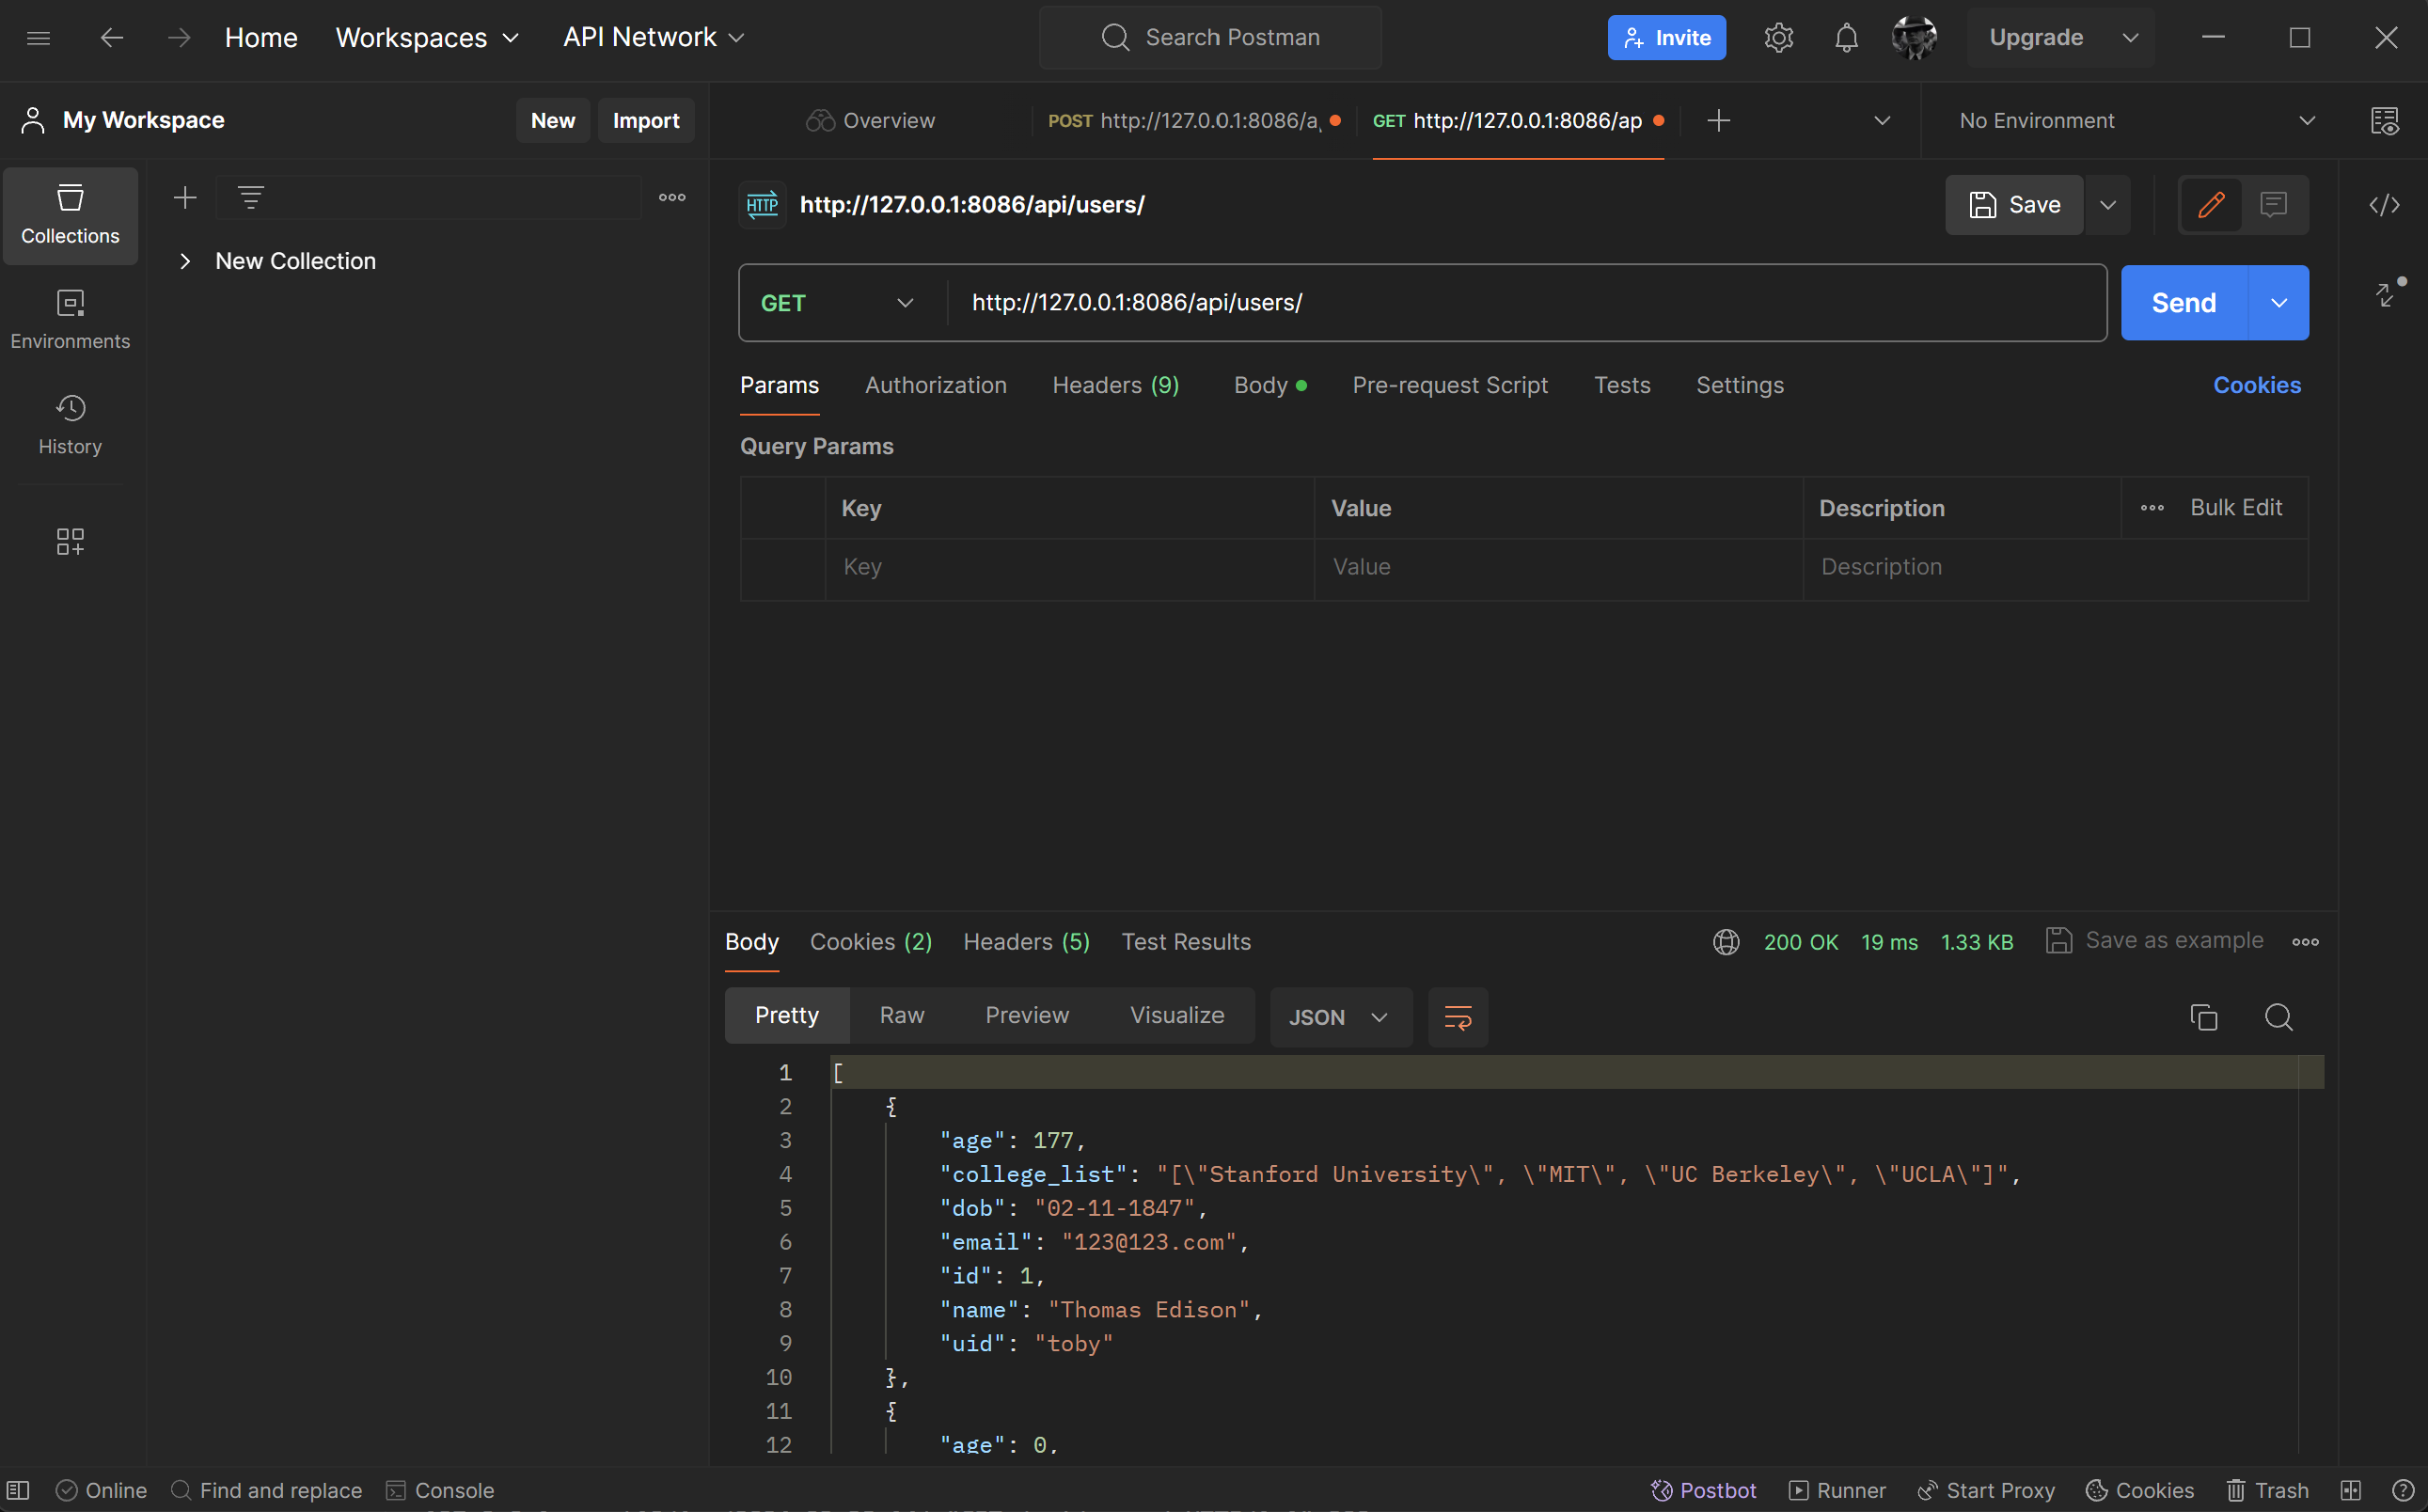
-
This shows the 200 success for the retrieval of the user list using the GET method. There are no body requirements since this is simply retrieving data from the backend. We did create a new, fresh SQLite database with our initialized test data for demonstration purposes.
- POST method in Postman:
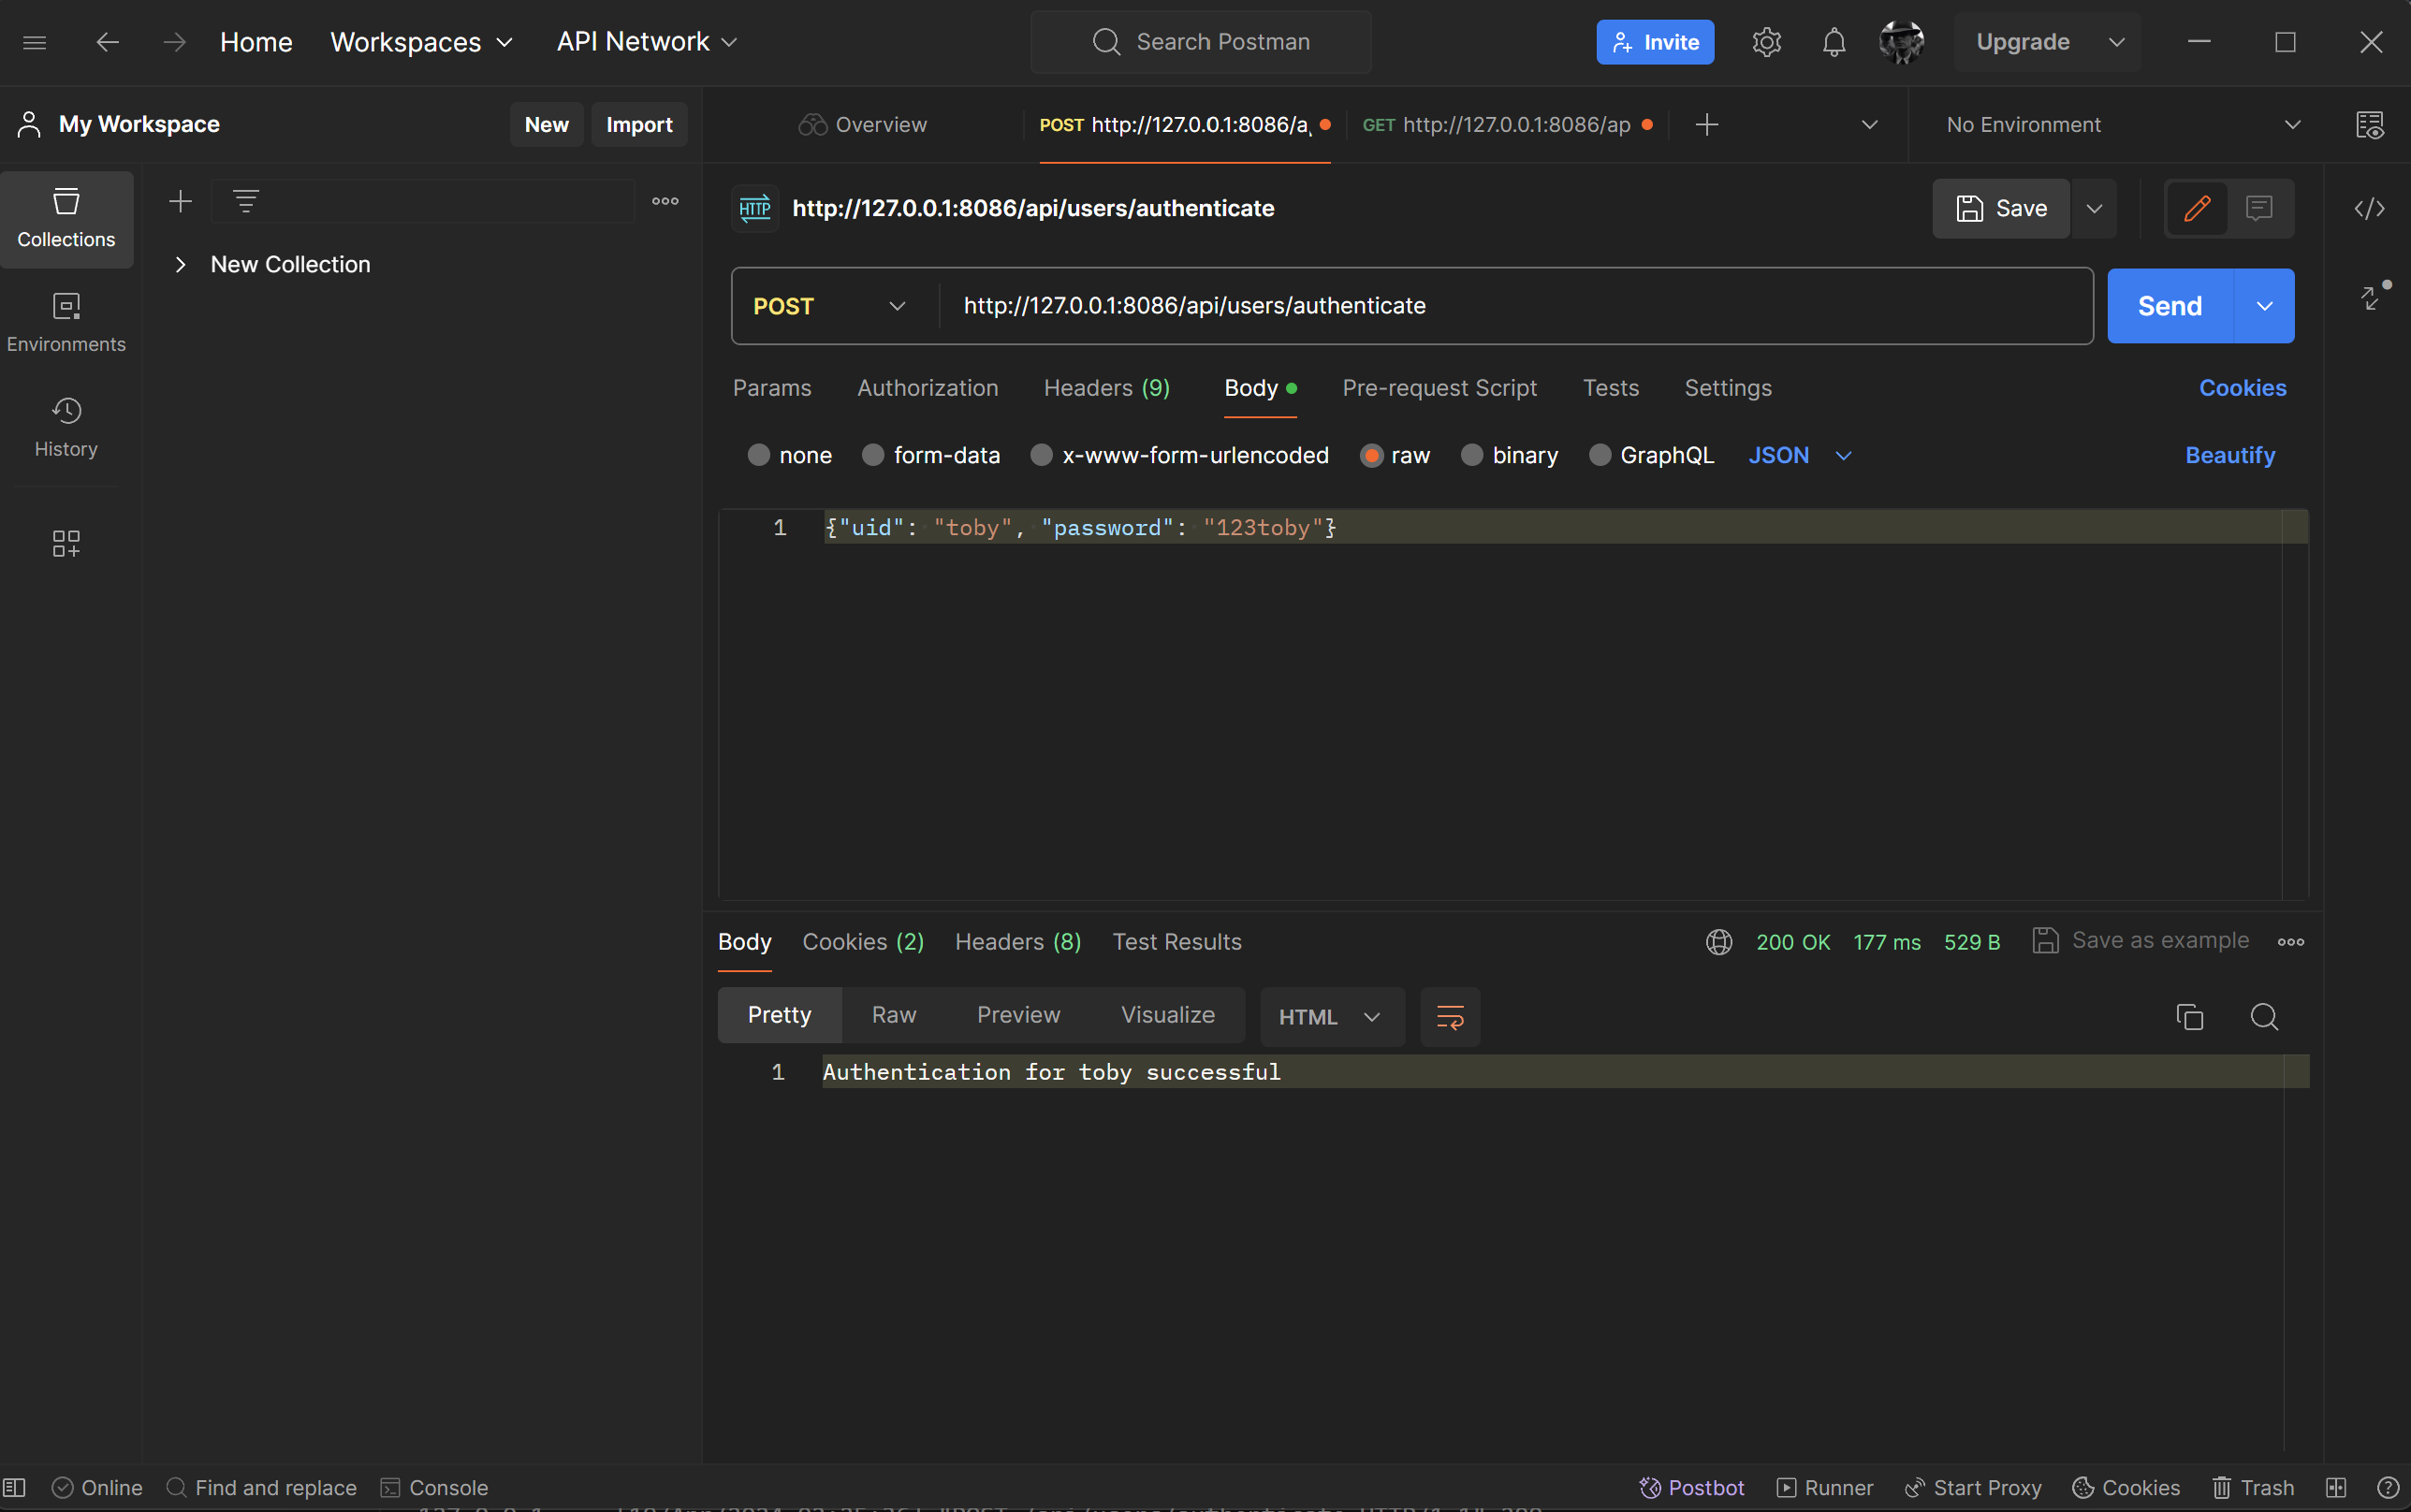
-
This shows the 200 success condition for the POST method for admin authentication.
- PUT method in Postman:

- This shows the
college_listdata for the first user (BEFORE).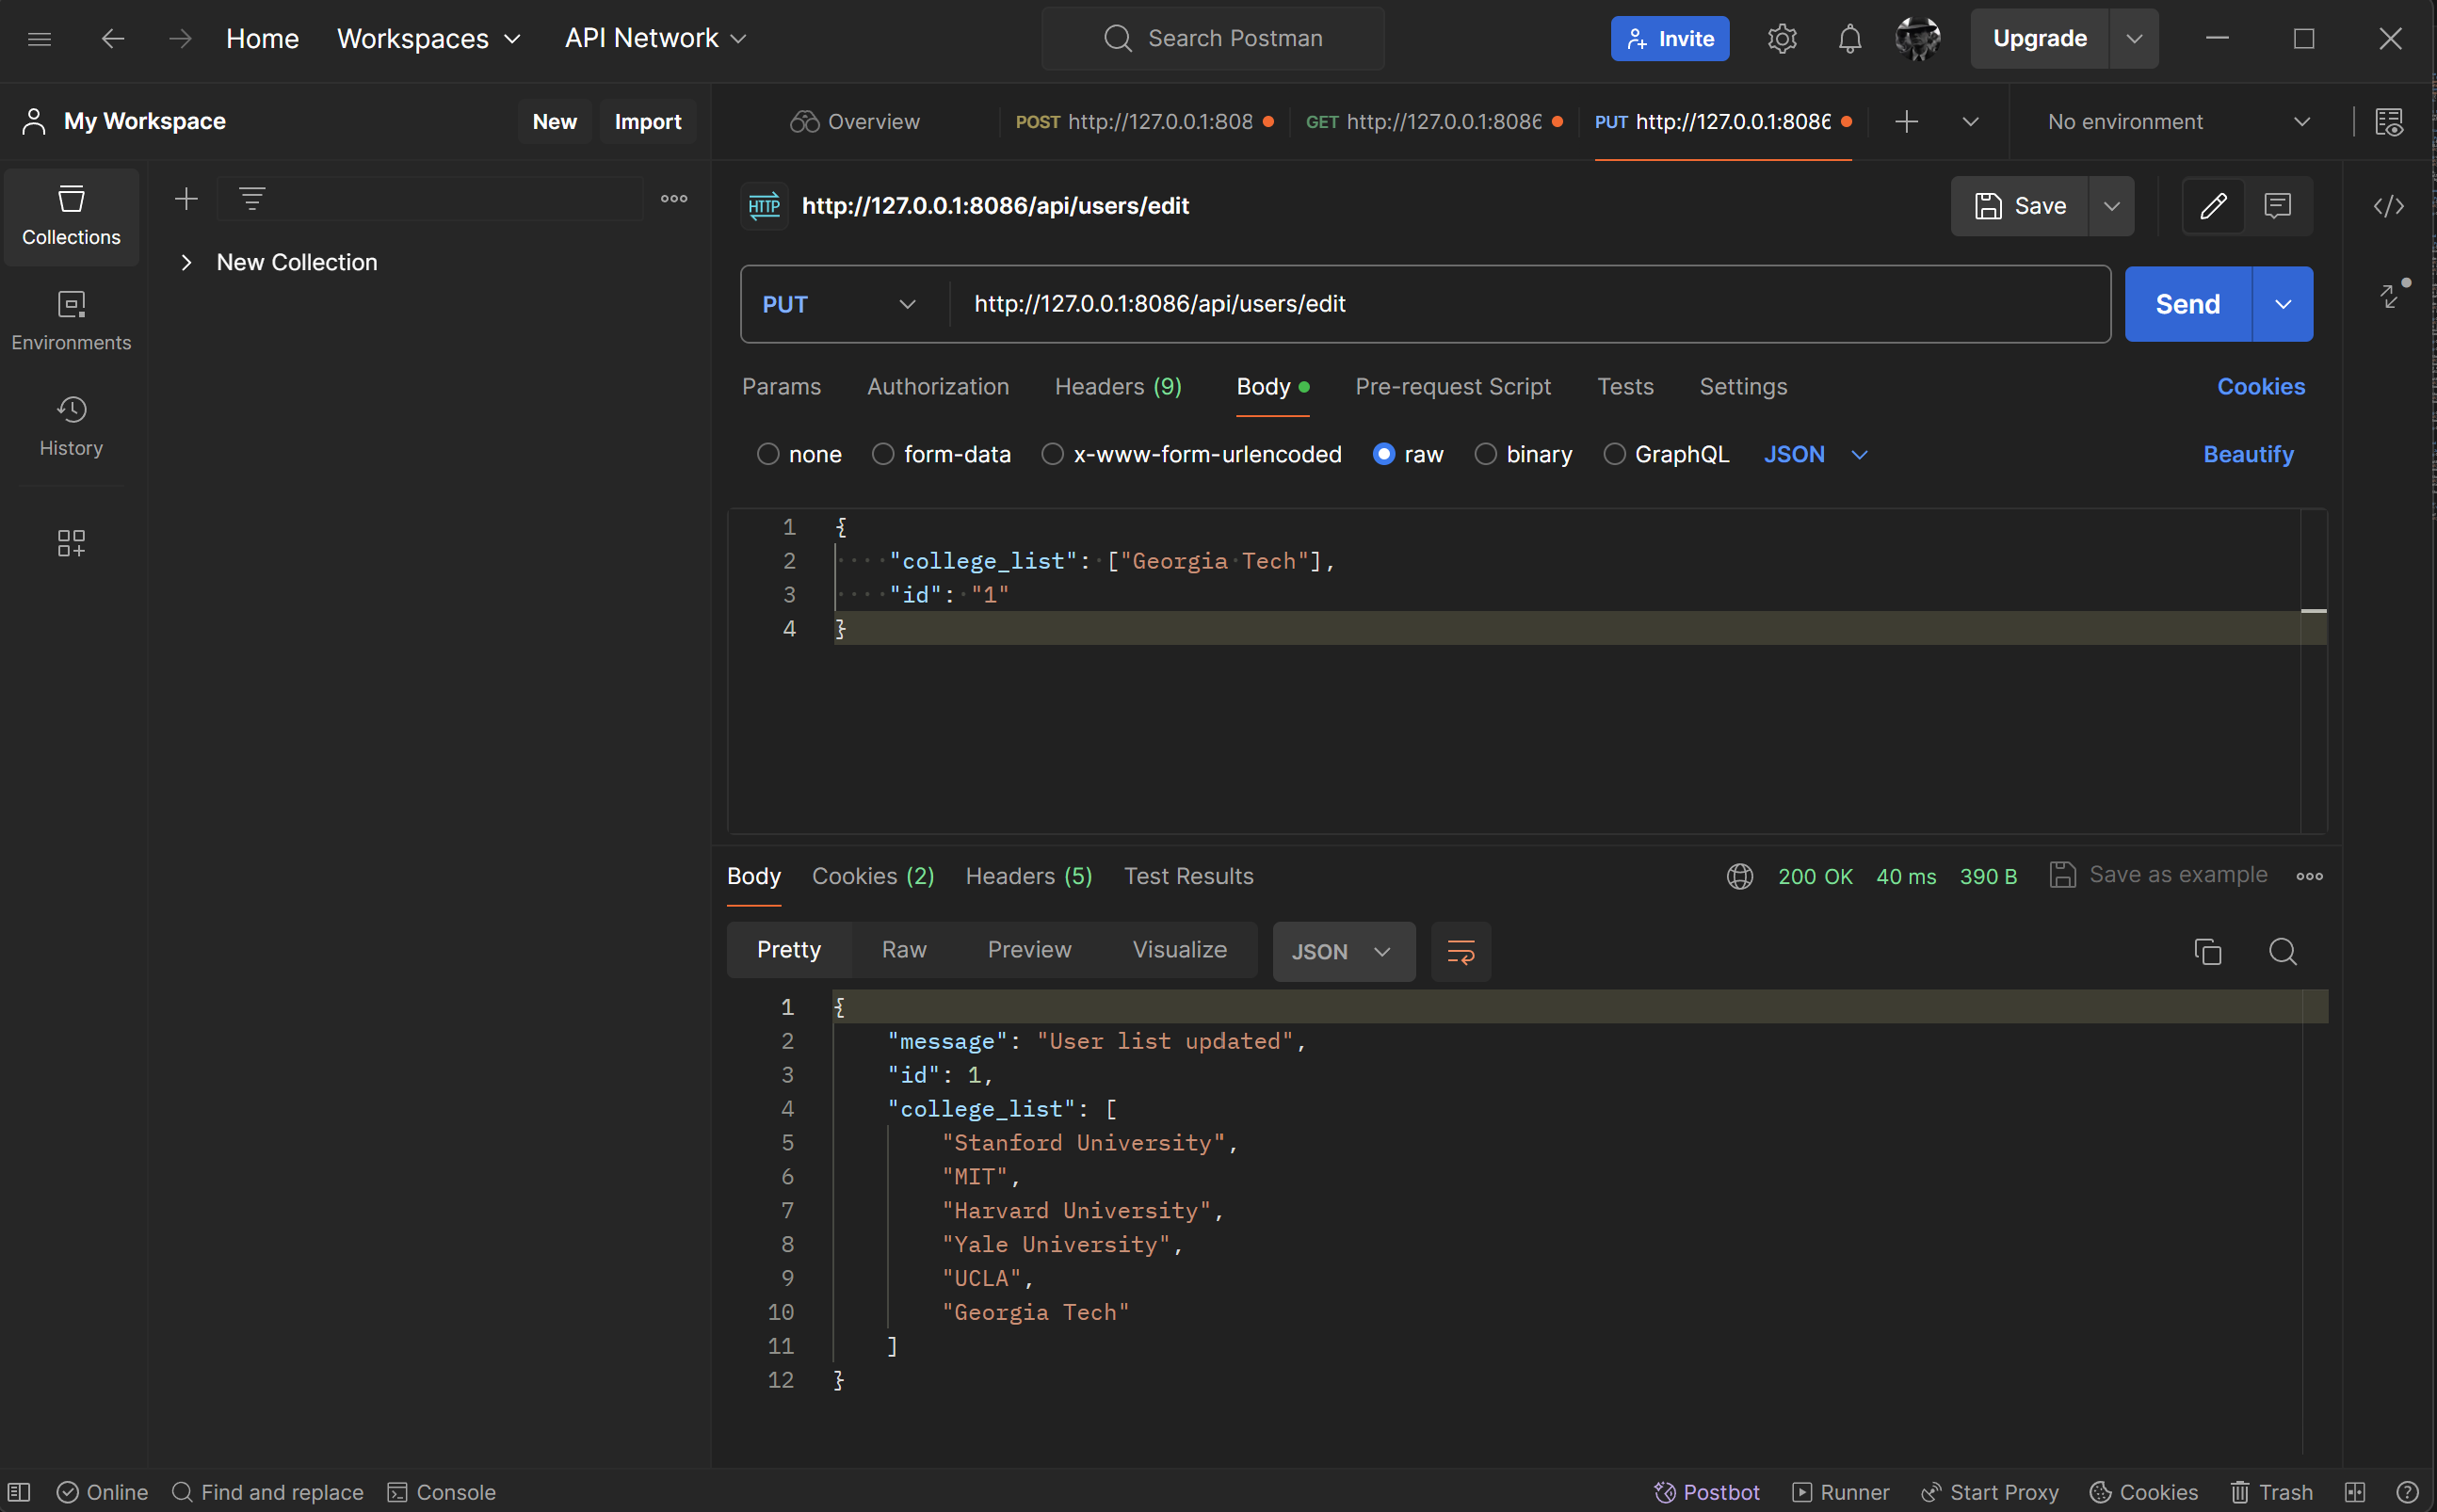
-
As seen, using a PUT method, we are able to edit the user’s college list by providing the user
idand the additional college name, which in this case was Georgia Tech (AFTER). - In Postman, show the JSON response for error for 400 when missing body on a POST request.
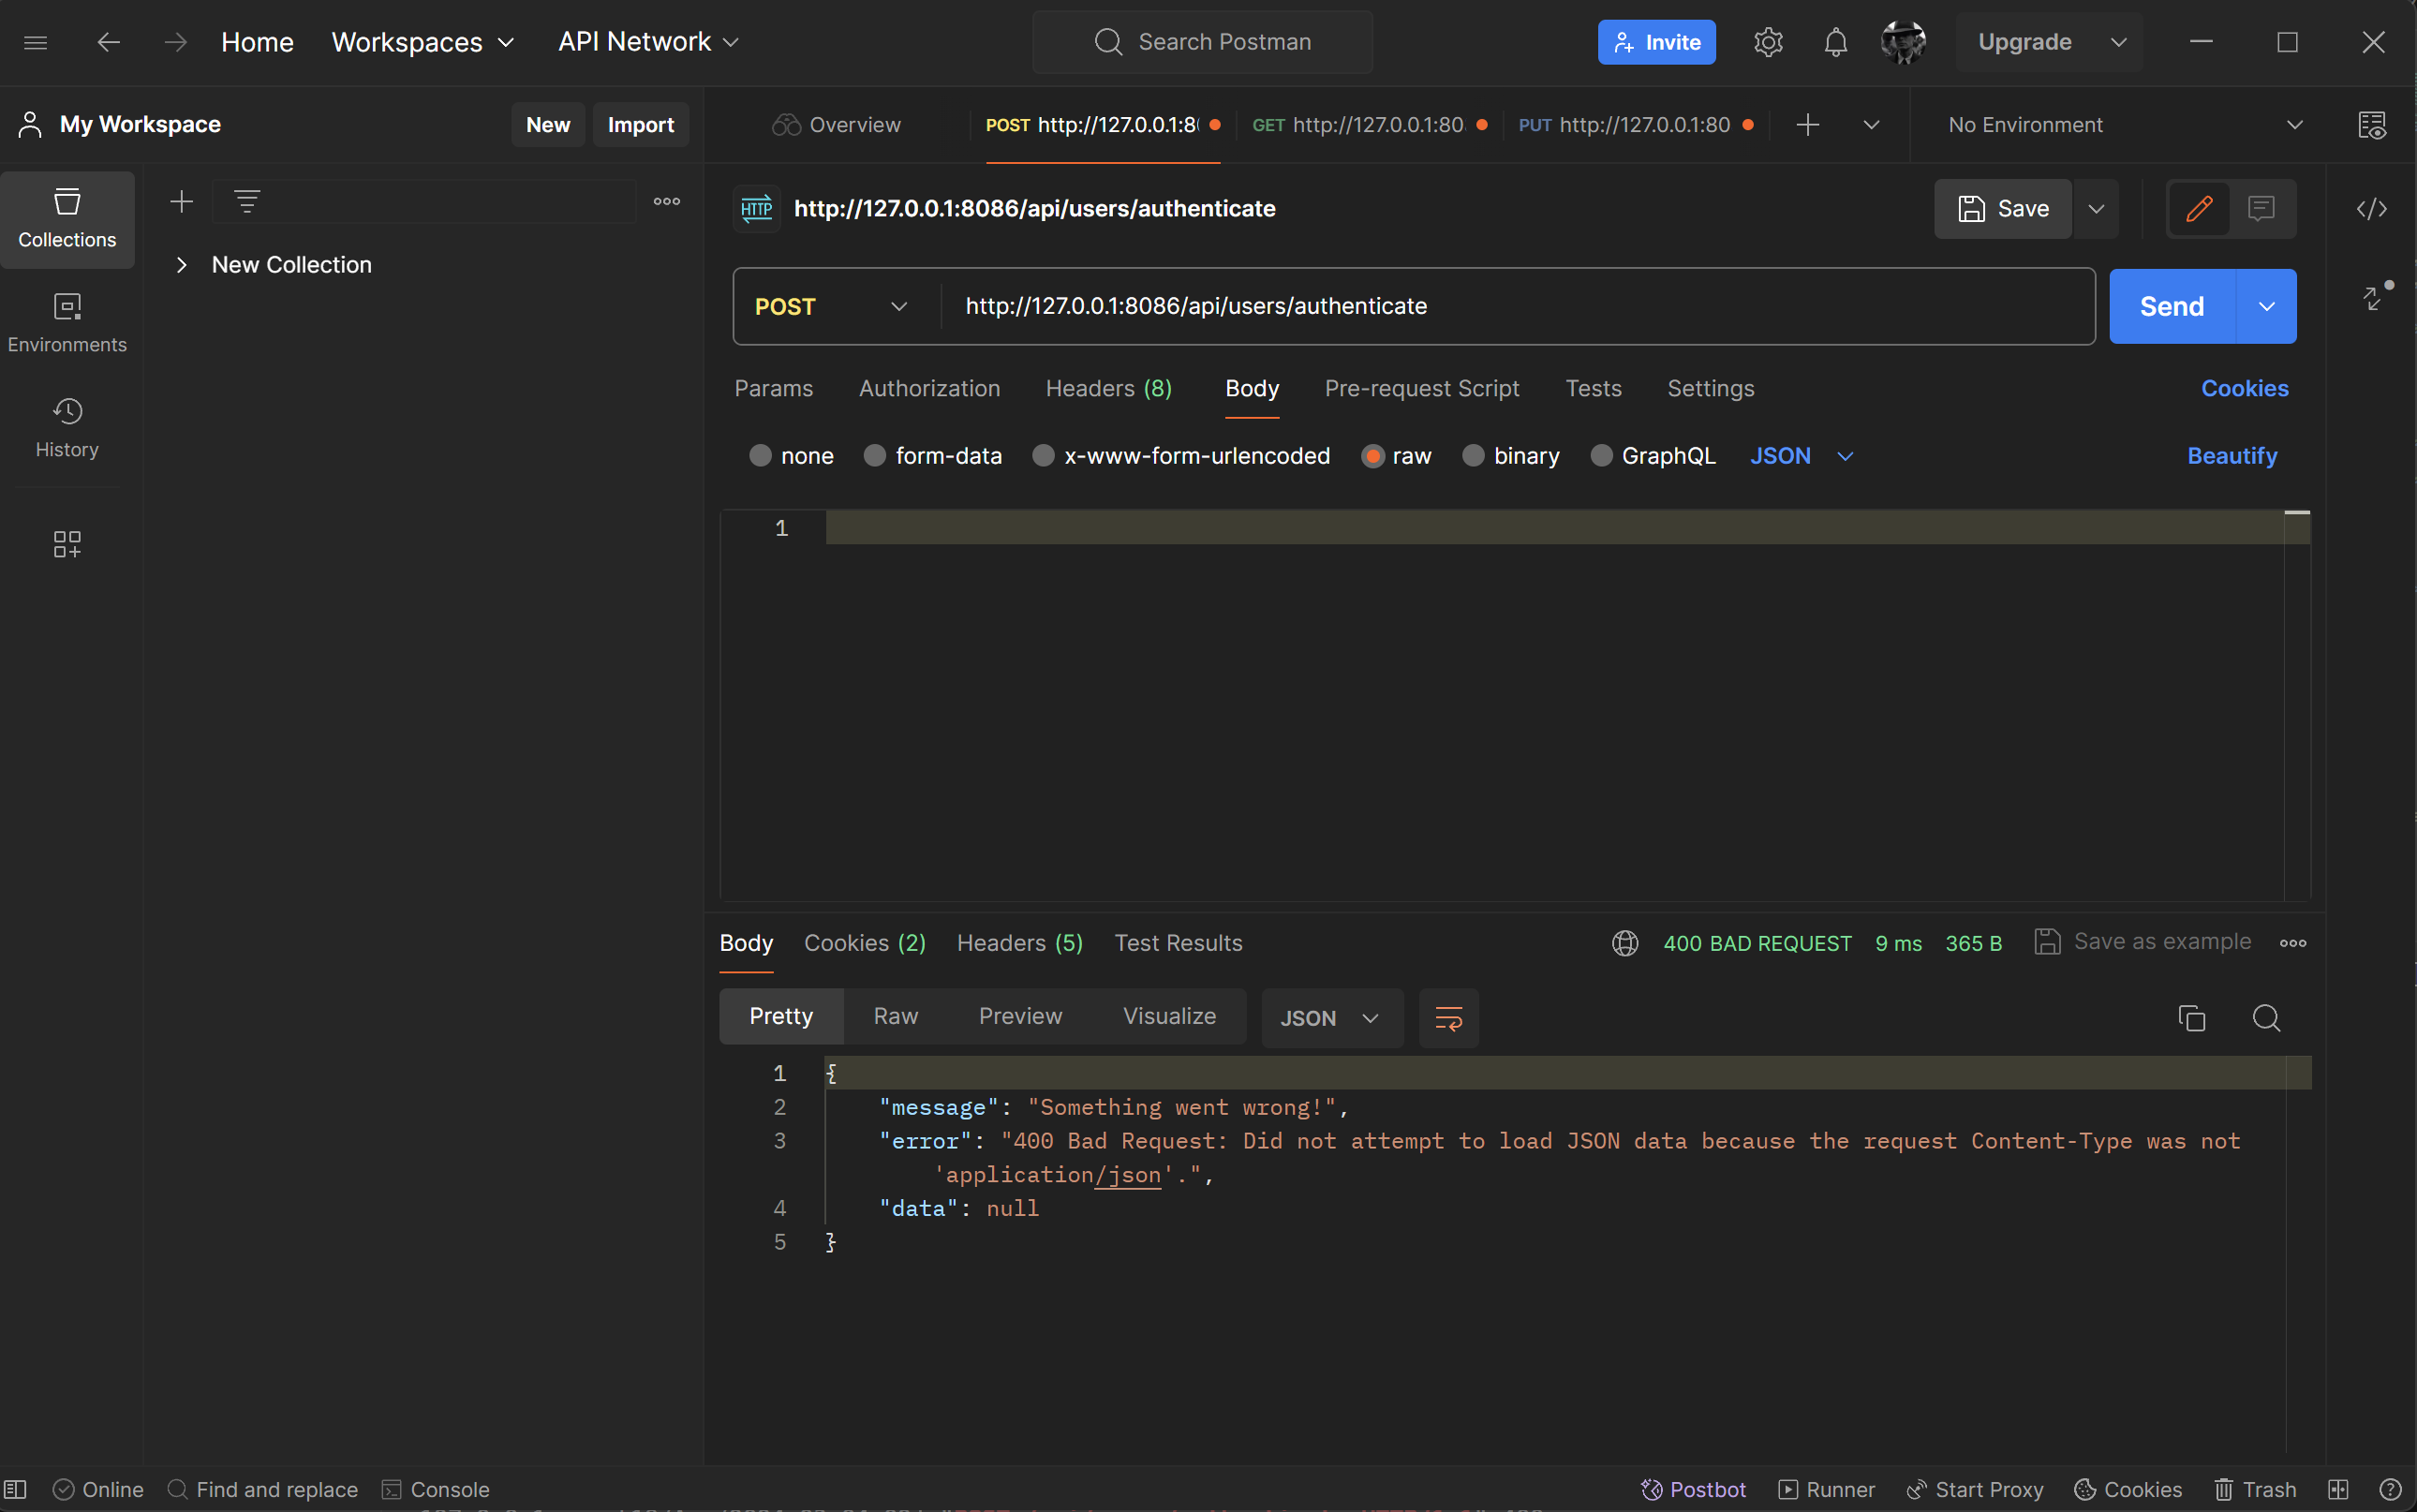
-
This shows the 400 error when there is a missing body for the POST request.
- In Postman, show the JSON response for error for 404 when providing an unknown user ID to a UPDATE request.
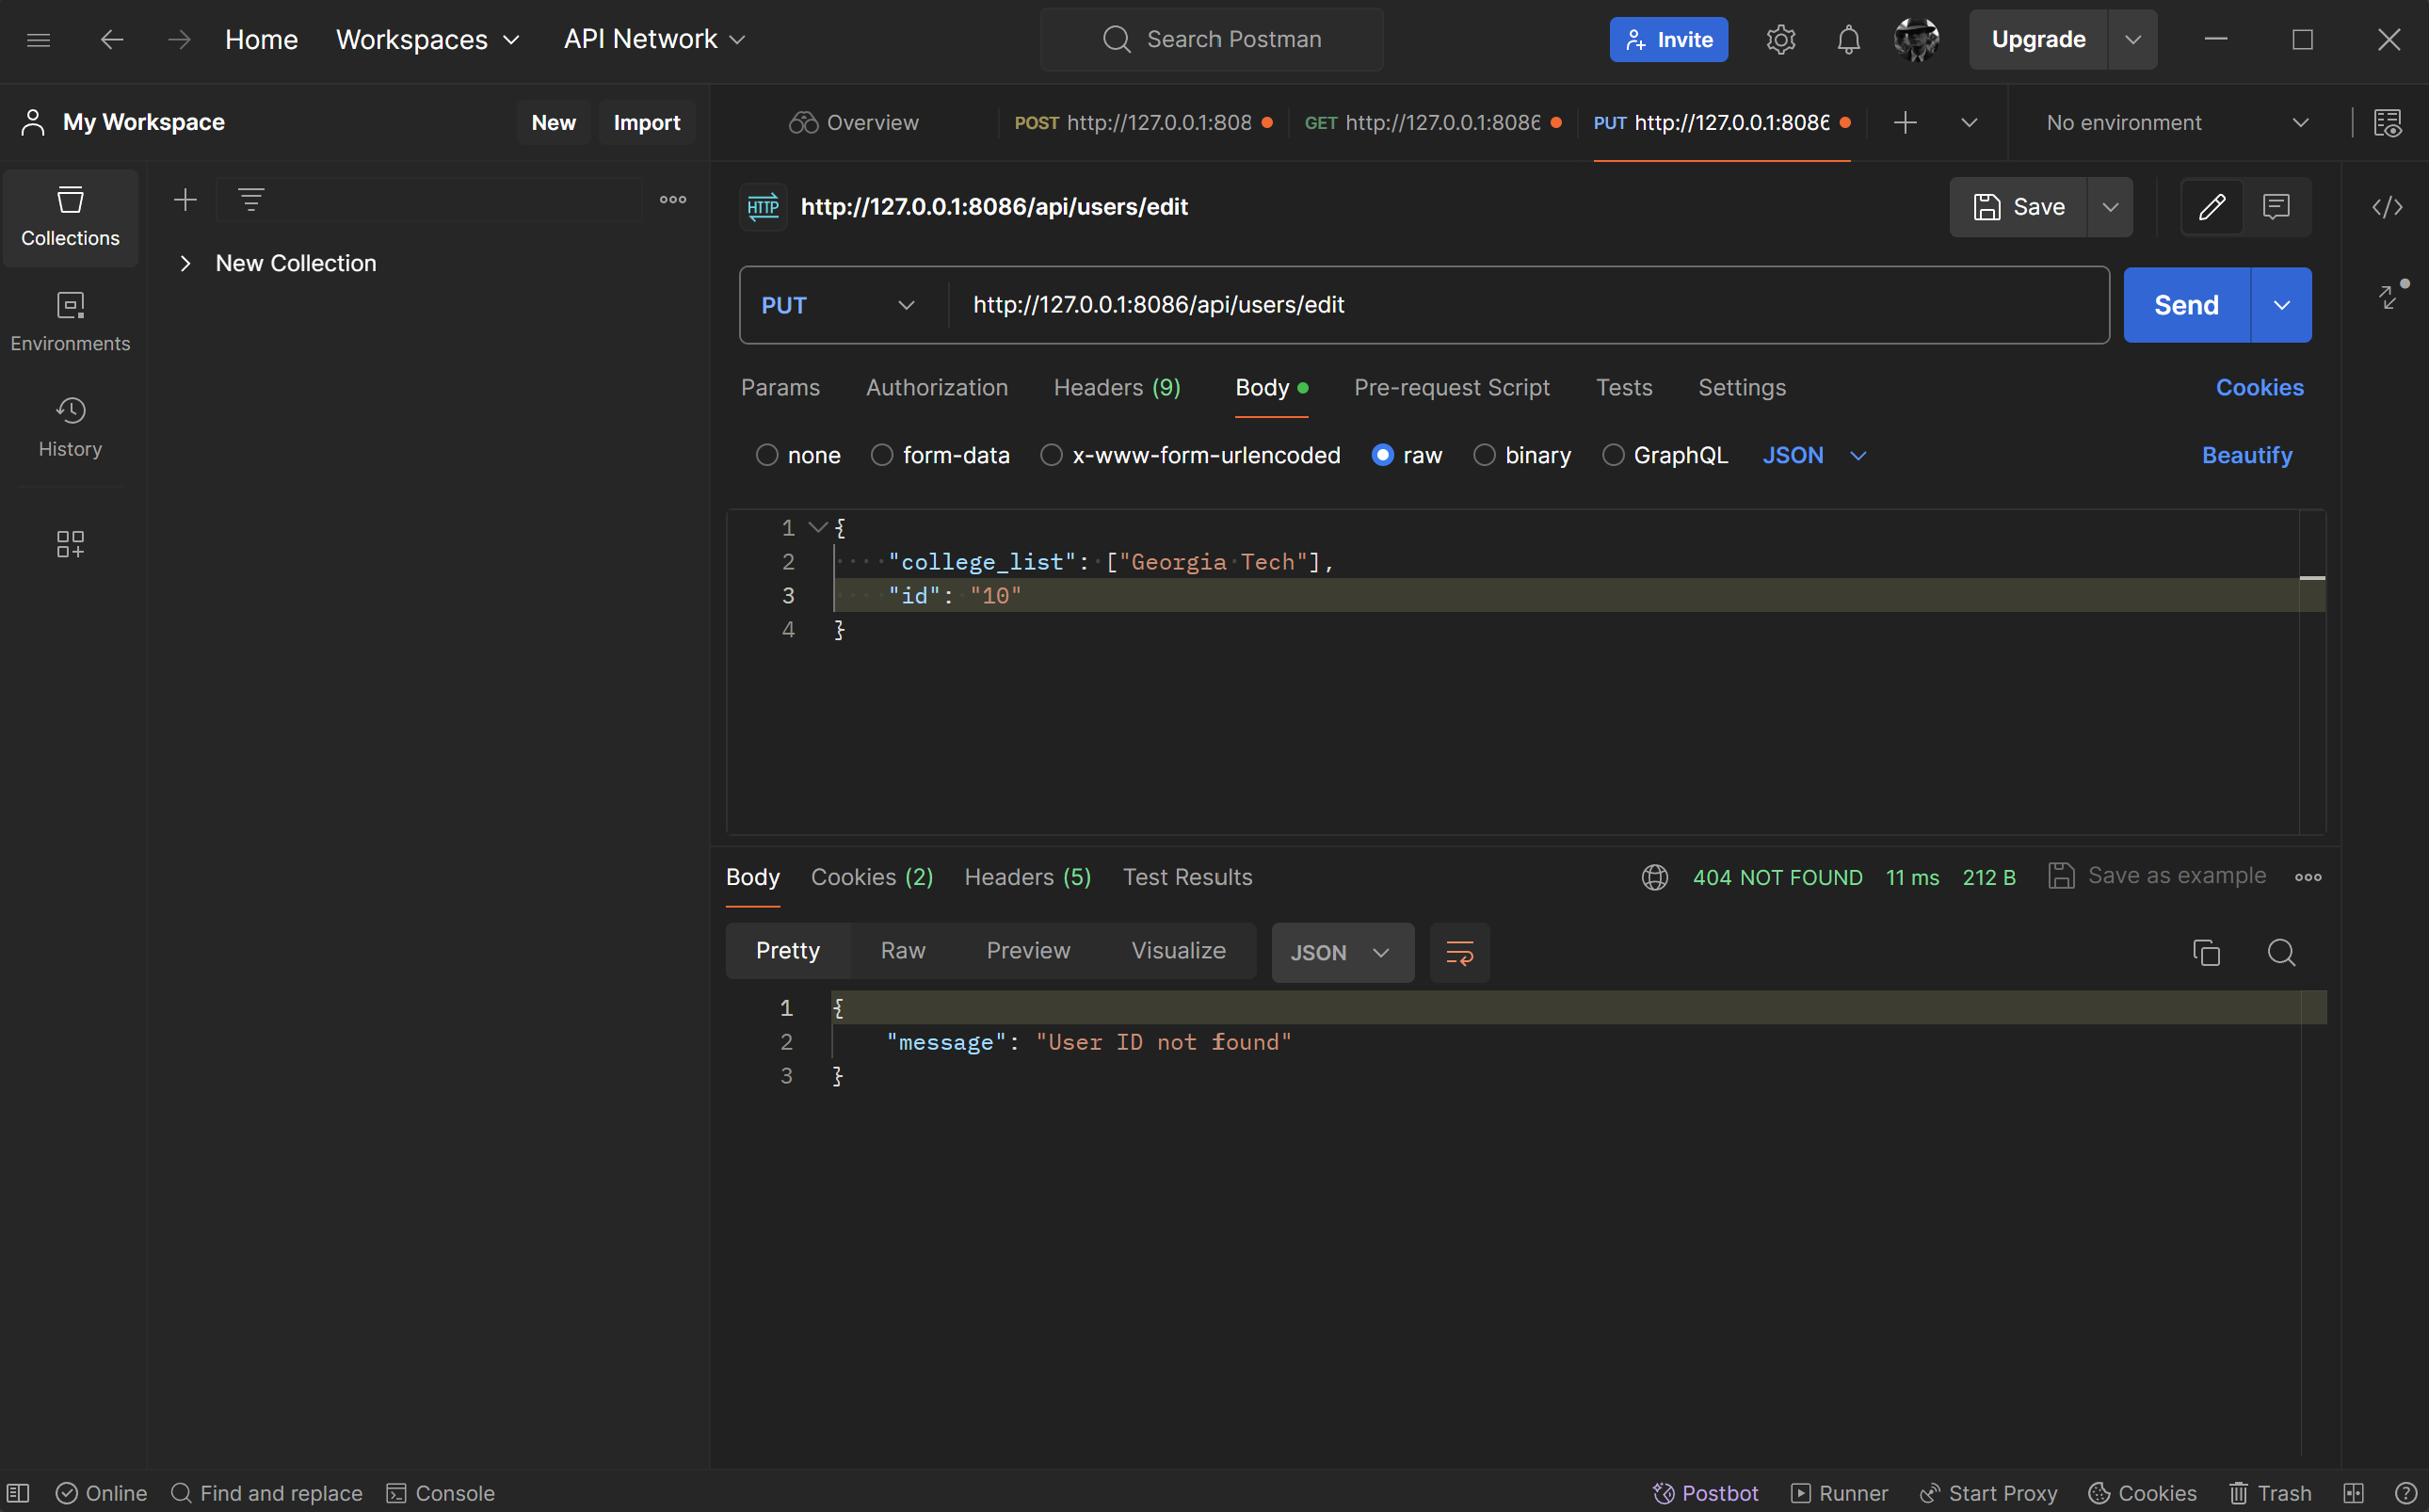
- This correctly shows a 404 NOT FOUND error with the message “User ID is not found” when an invalid user ID is supplied.
Frontend
Blog JavaScript API fetch code and formatting code to display JSON.
-
In Chrome inspect, show response of JSON objects from fetch of GET, POST, and UPDATE methods.
- POST method:
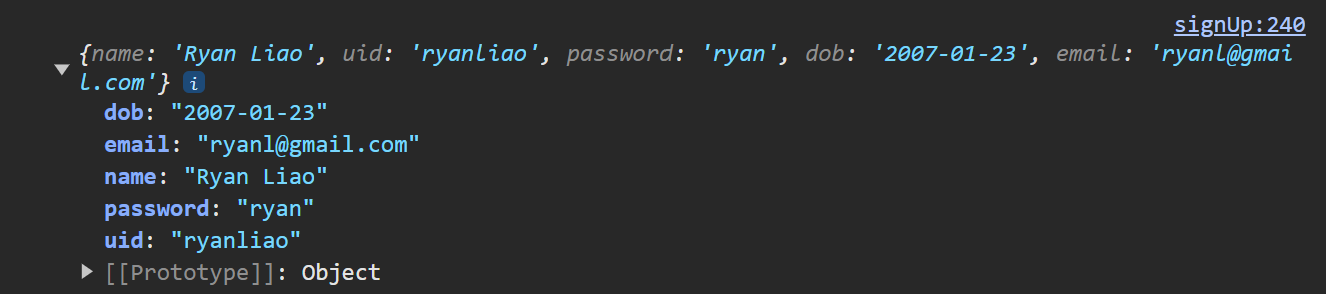
-
This sends the user entered data to the backend to be stored as a new user. They can use the same credential to login again.
- GET method:
-
This fetches the login data from the backend in order to validate login attempts.
- PUT method:
-
While there is an error in console due to a new variable mismatch error between our frontend and backend, the output seen here should reflect the integer
idof the entered username and their updatedcollege_list, both of which are found in the SQLite database. -
Show a demo (GET) of obtaining an Array of JSON objects that are formatted into the browsers screen in the Chrome browser.
- Image of JSON data fetch in the frontend:
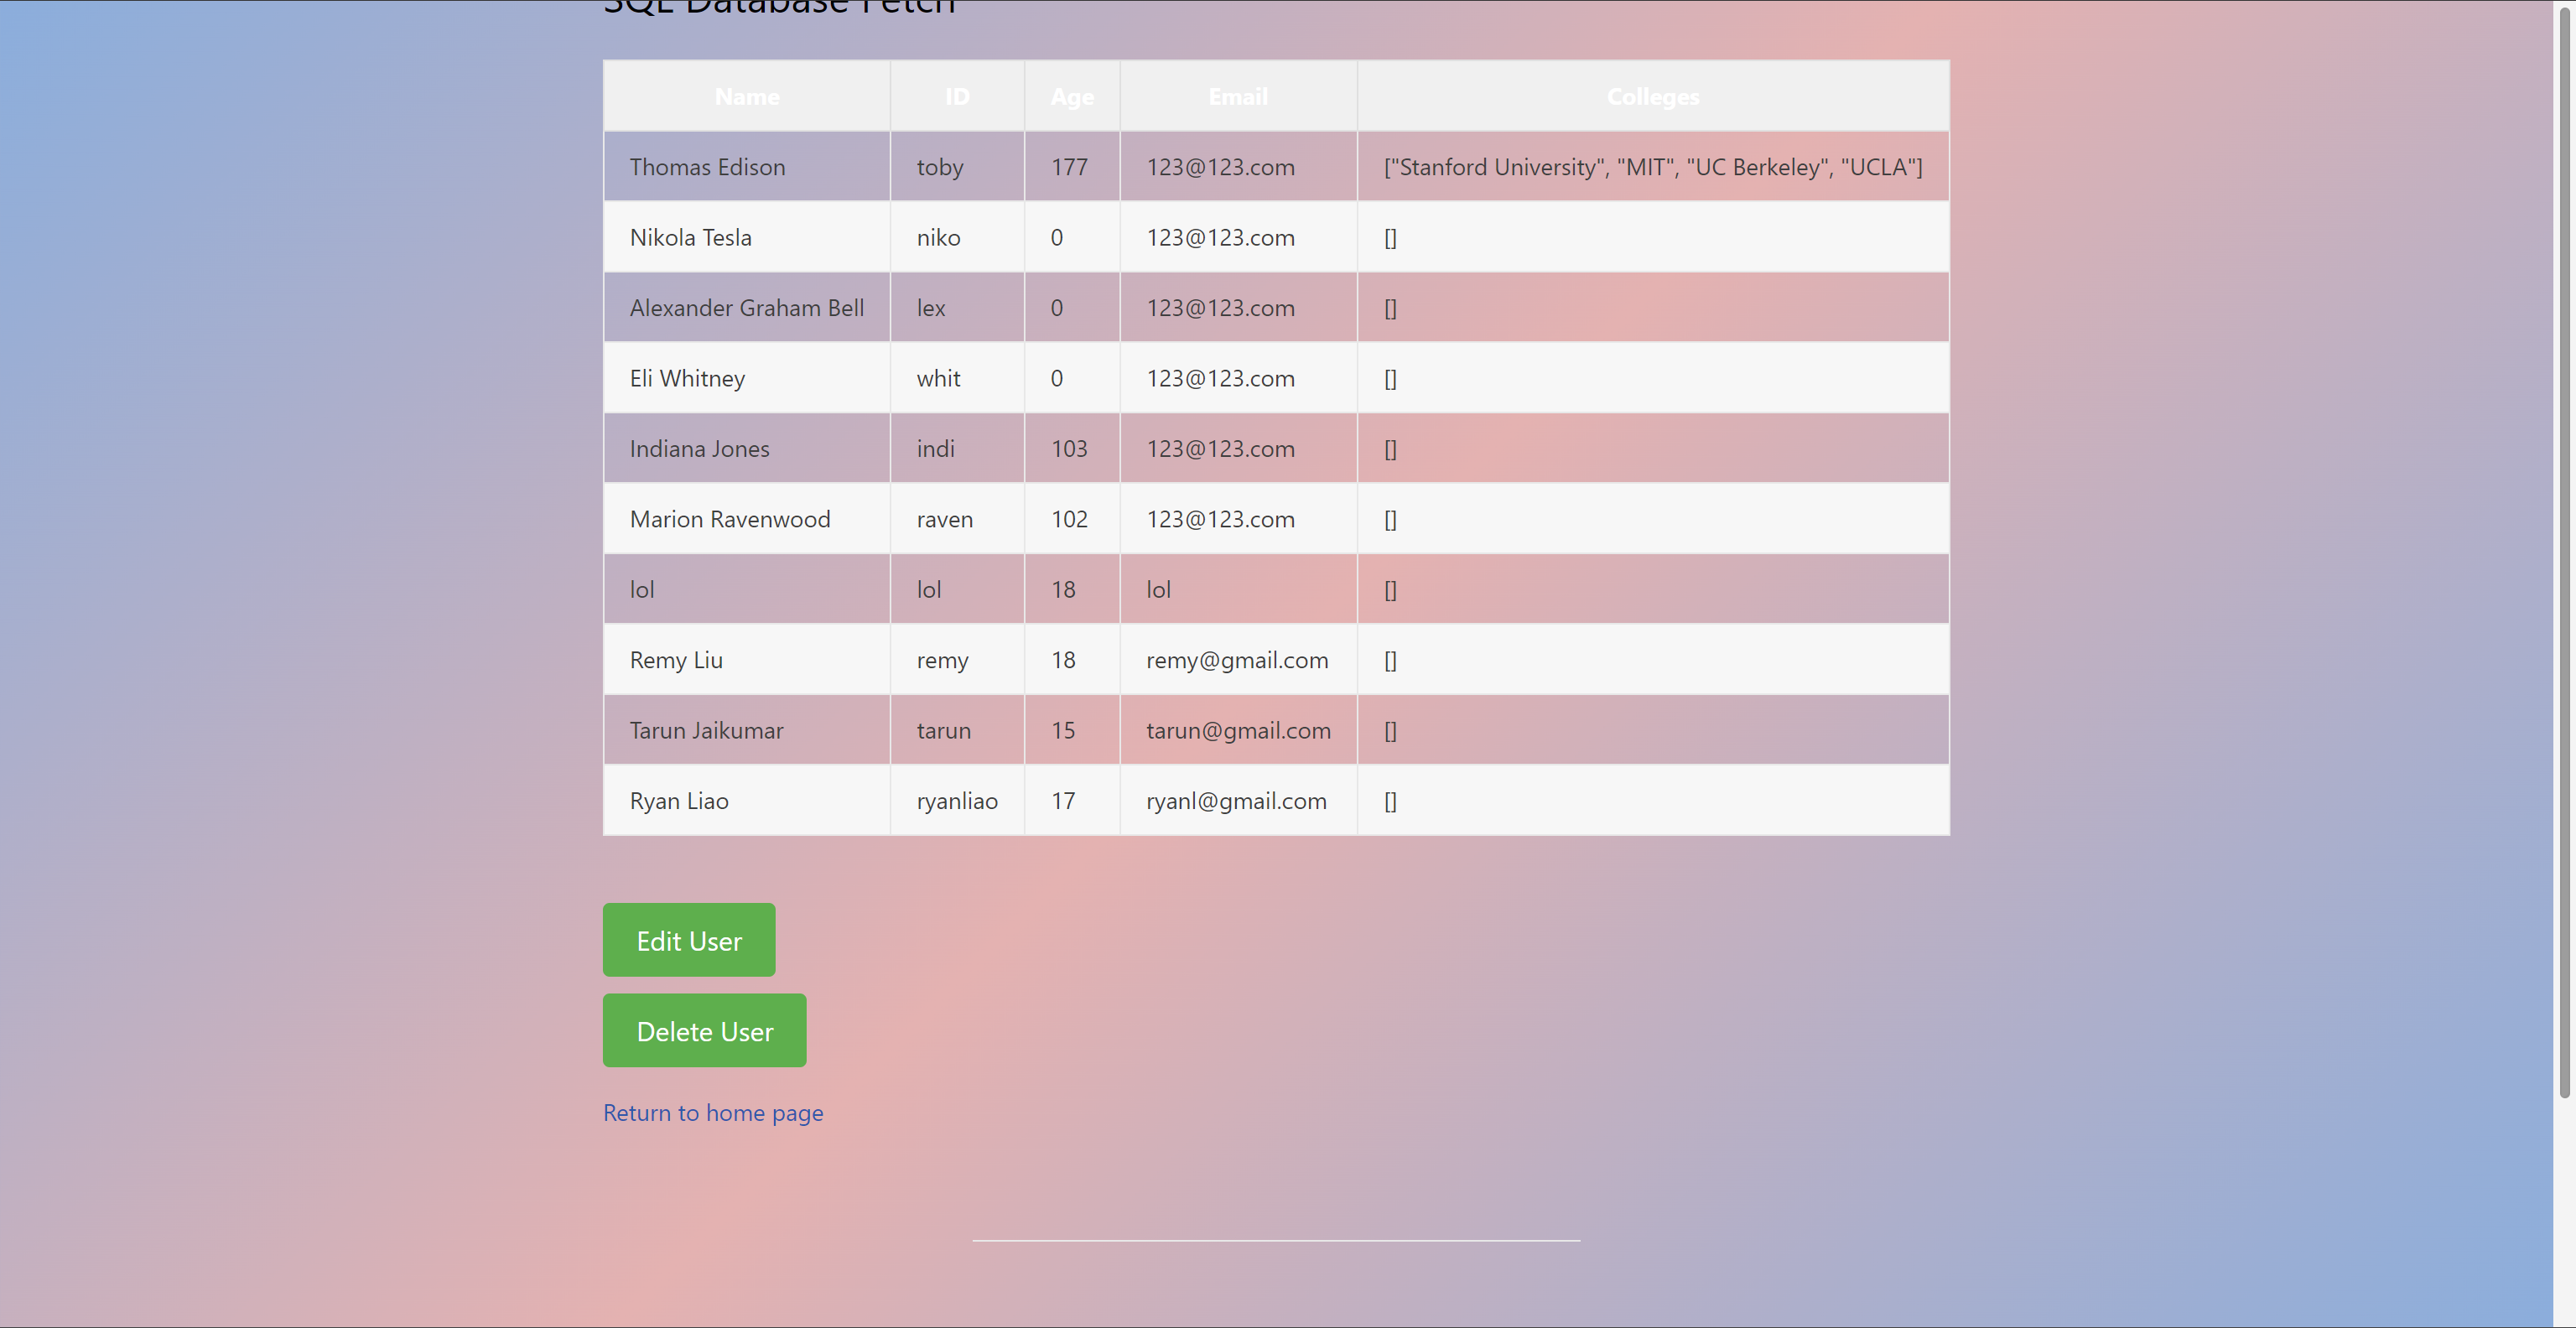
- We can view the database of users in the frontend only after logging in with the admin credentials. The JavaScript code in the frontend that handles the fetch function is as seen in the following image:
-
It is seen that the code is using
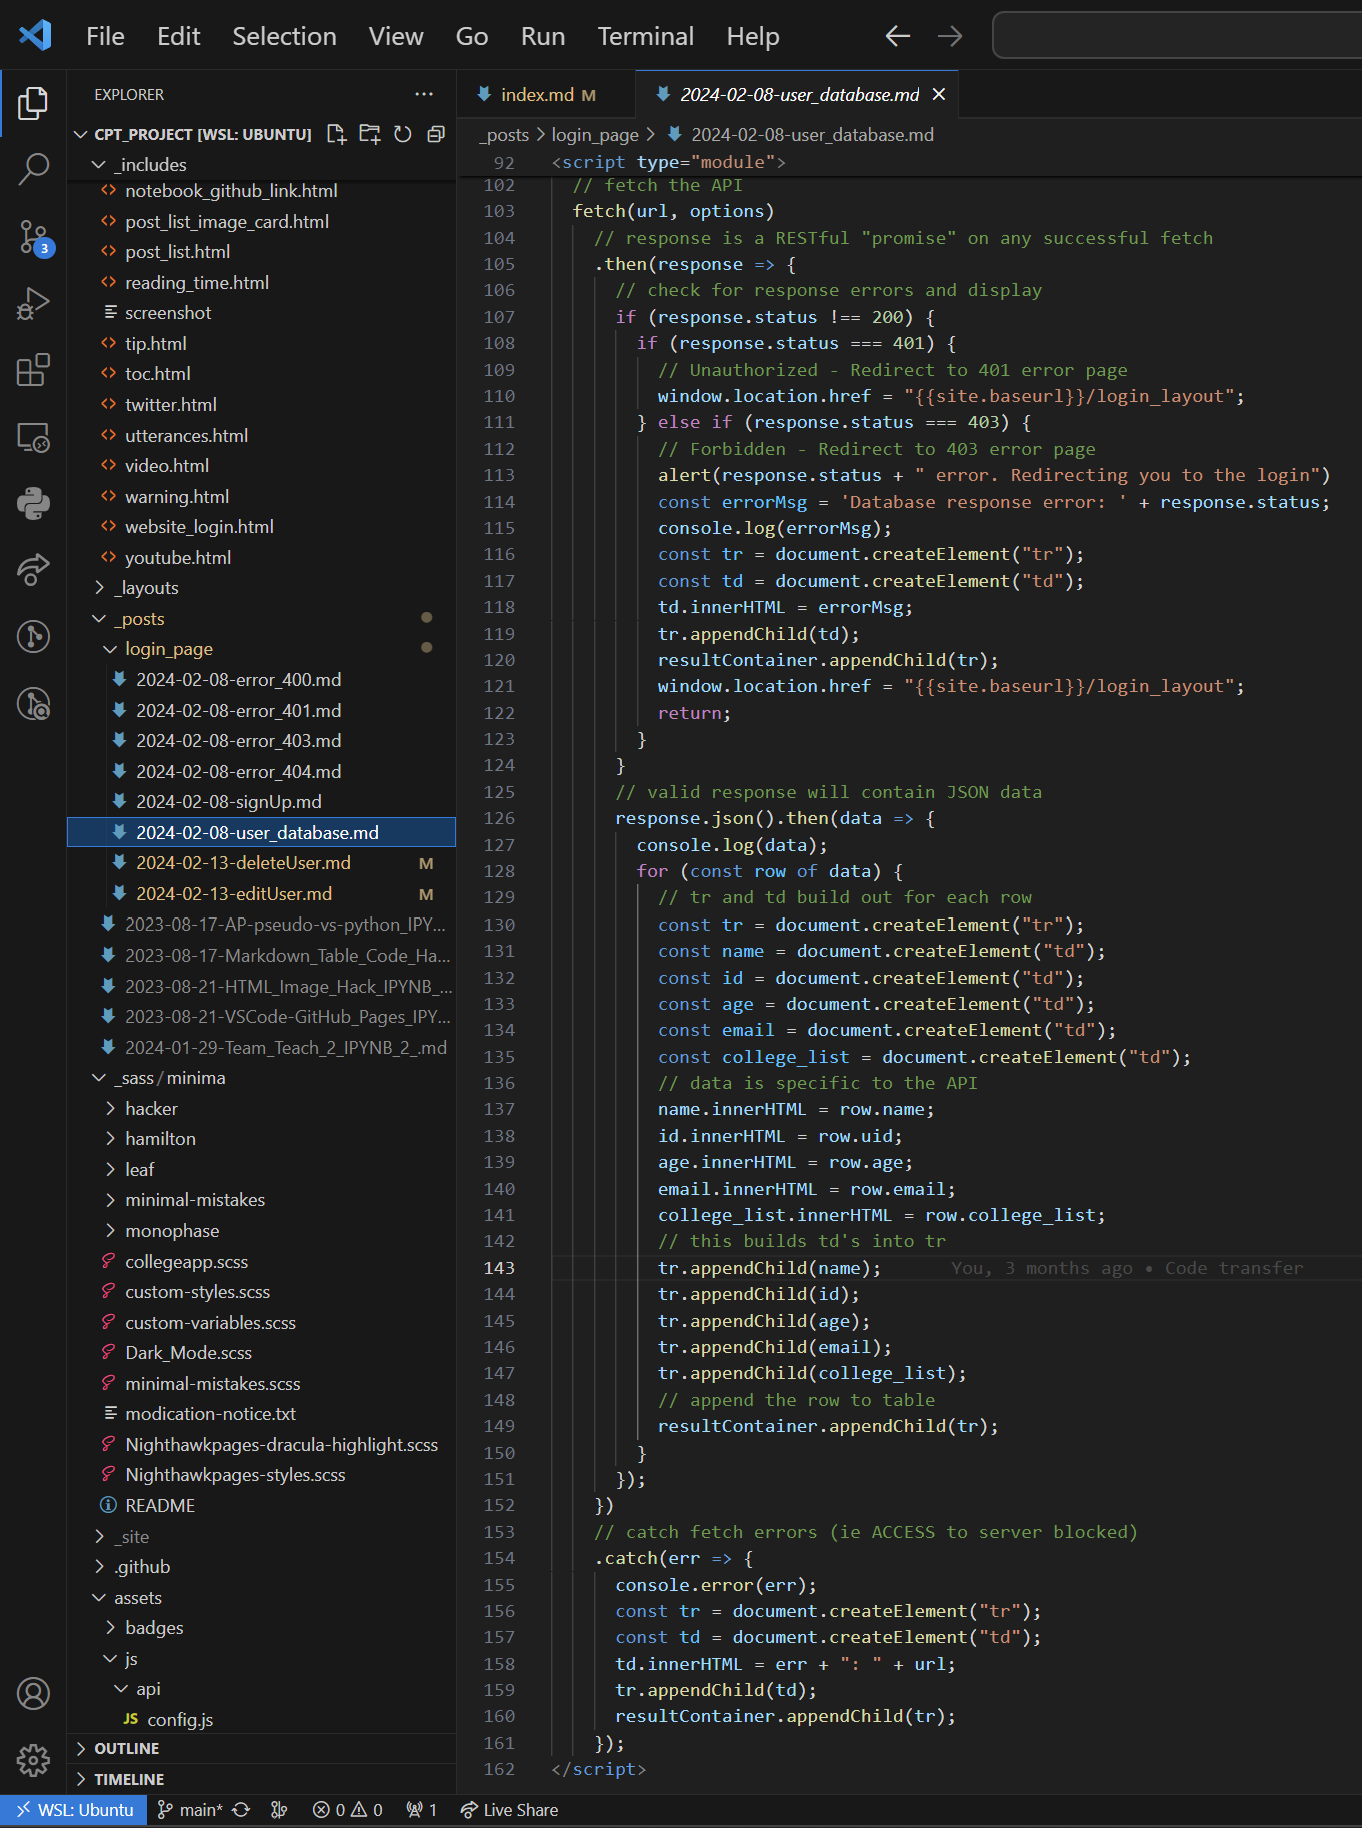
fetchto obtain data from the/usersendpoint in the user API. The specific link ishttp://127.0.0.1:8086/api/users. The fetched data is then formatted into a table, with the appropriate data going into the appropriate columns. - Code that performs iteration for the user database fetch:
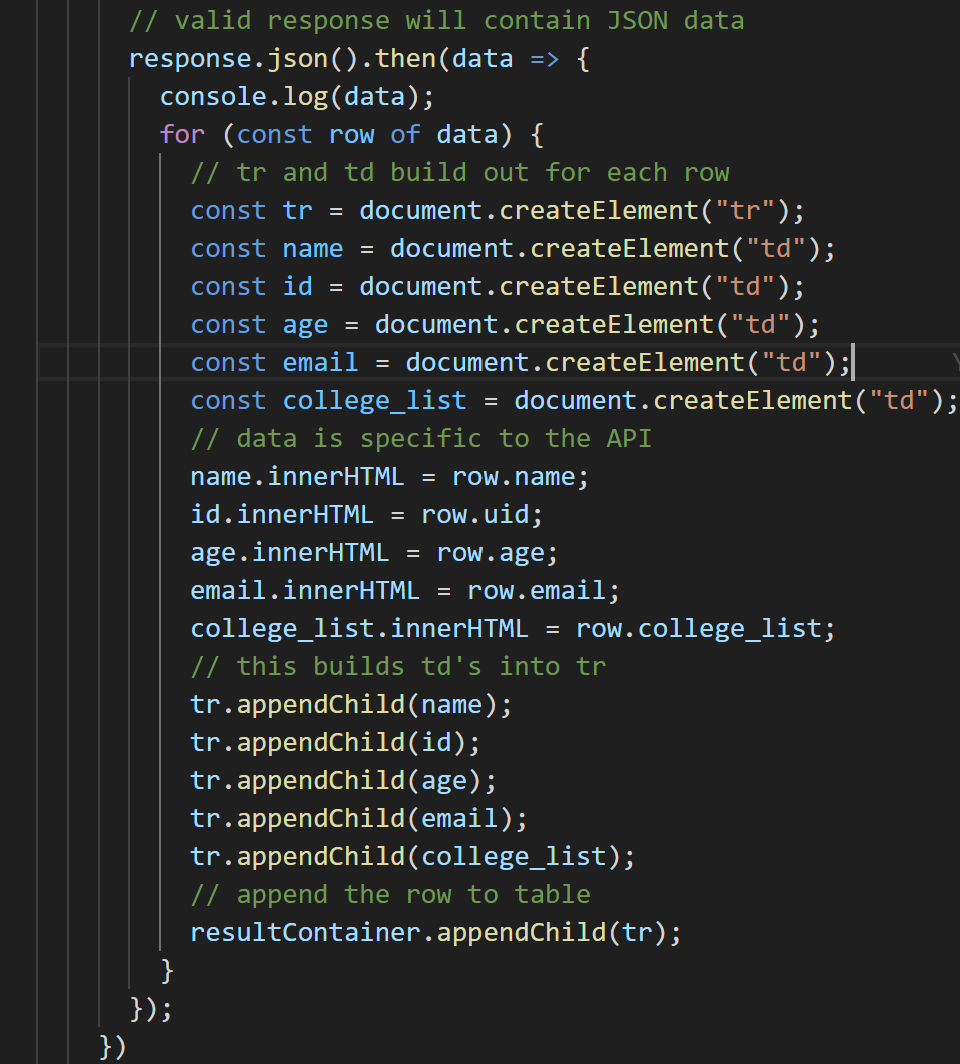
-
The JavaScript code fetches user data from an API endpoint using the Fetch API, parses the JSON response, and dynamically creates HTML table rows and cells to display the fetched data. Each row of data is represented as an object, and the code iterates through the array of objects, creating a new table row and setting the content of each cell with the corresponding data.
-
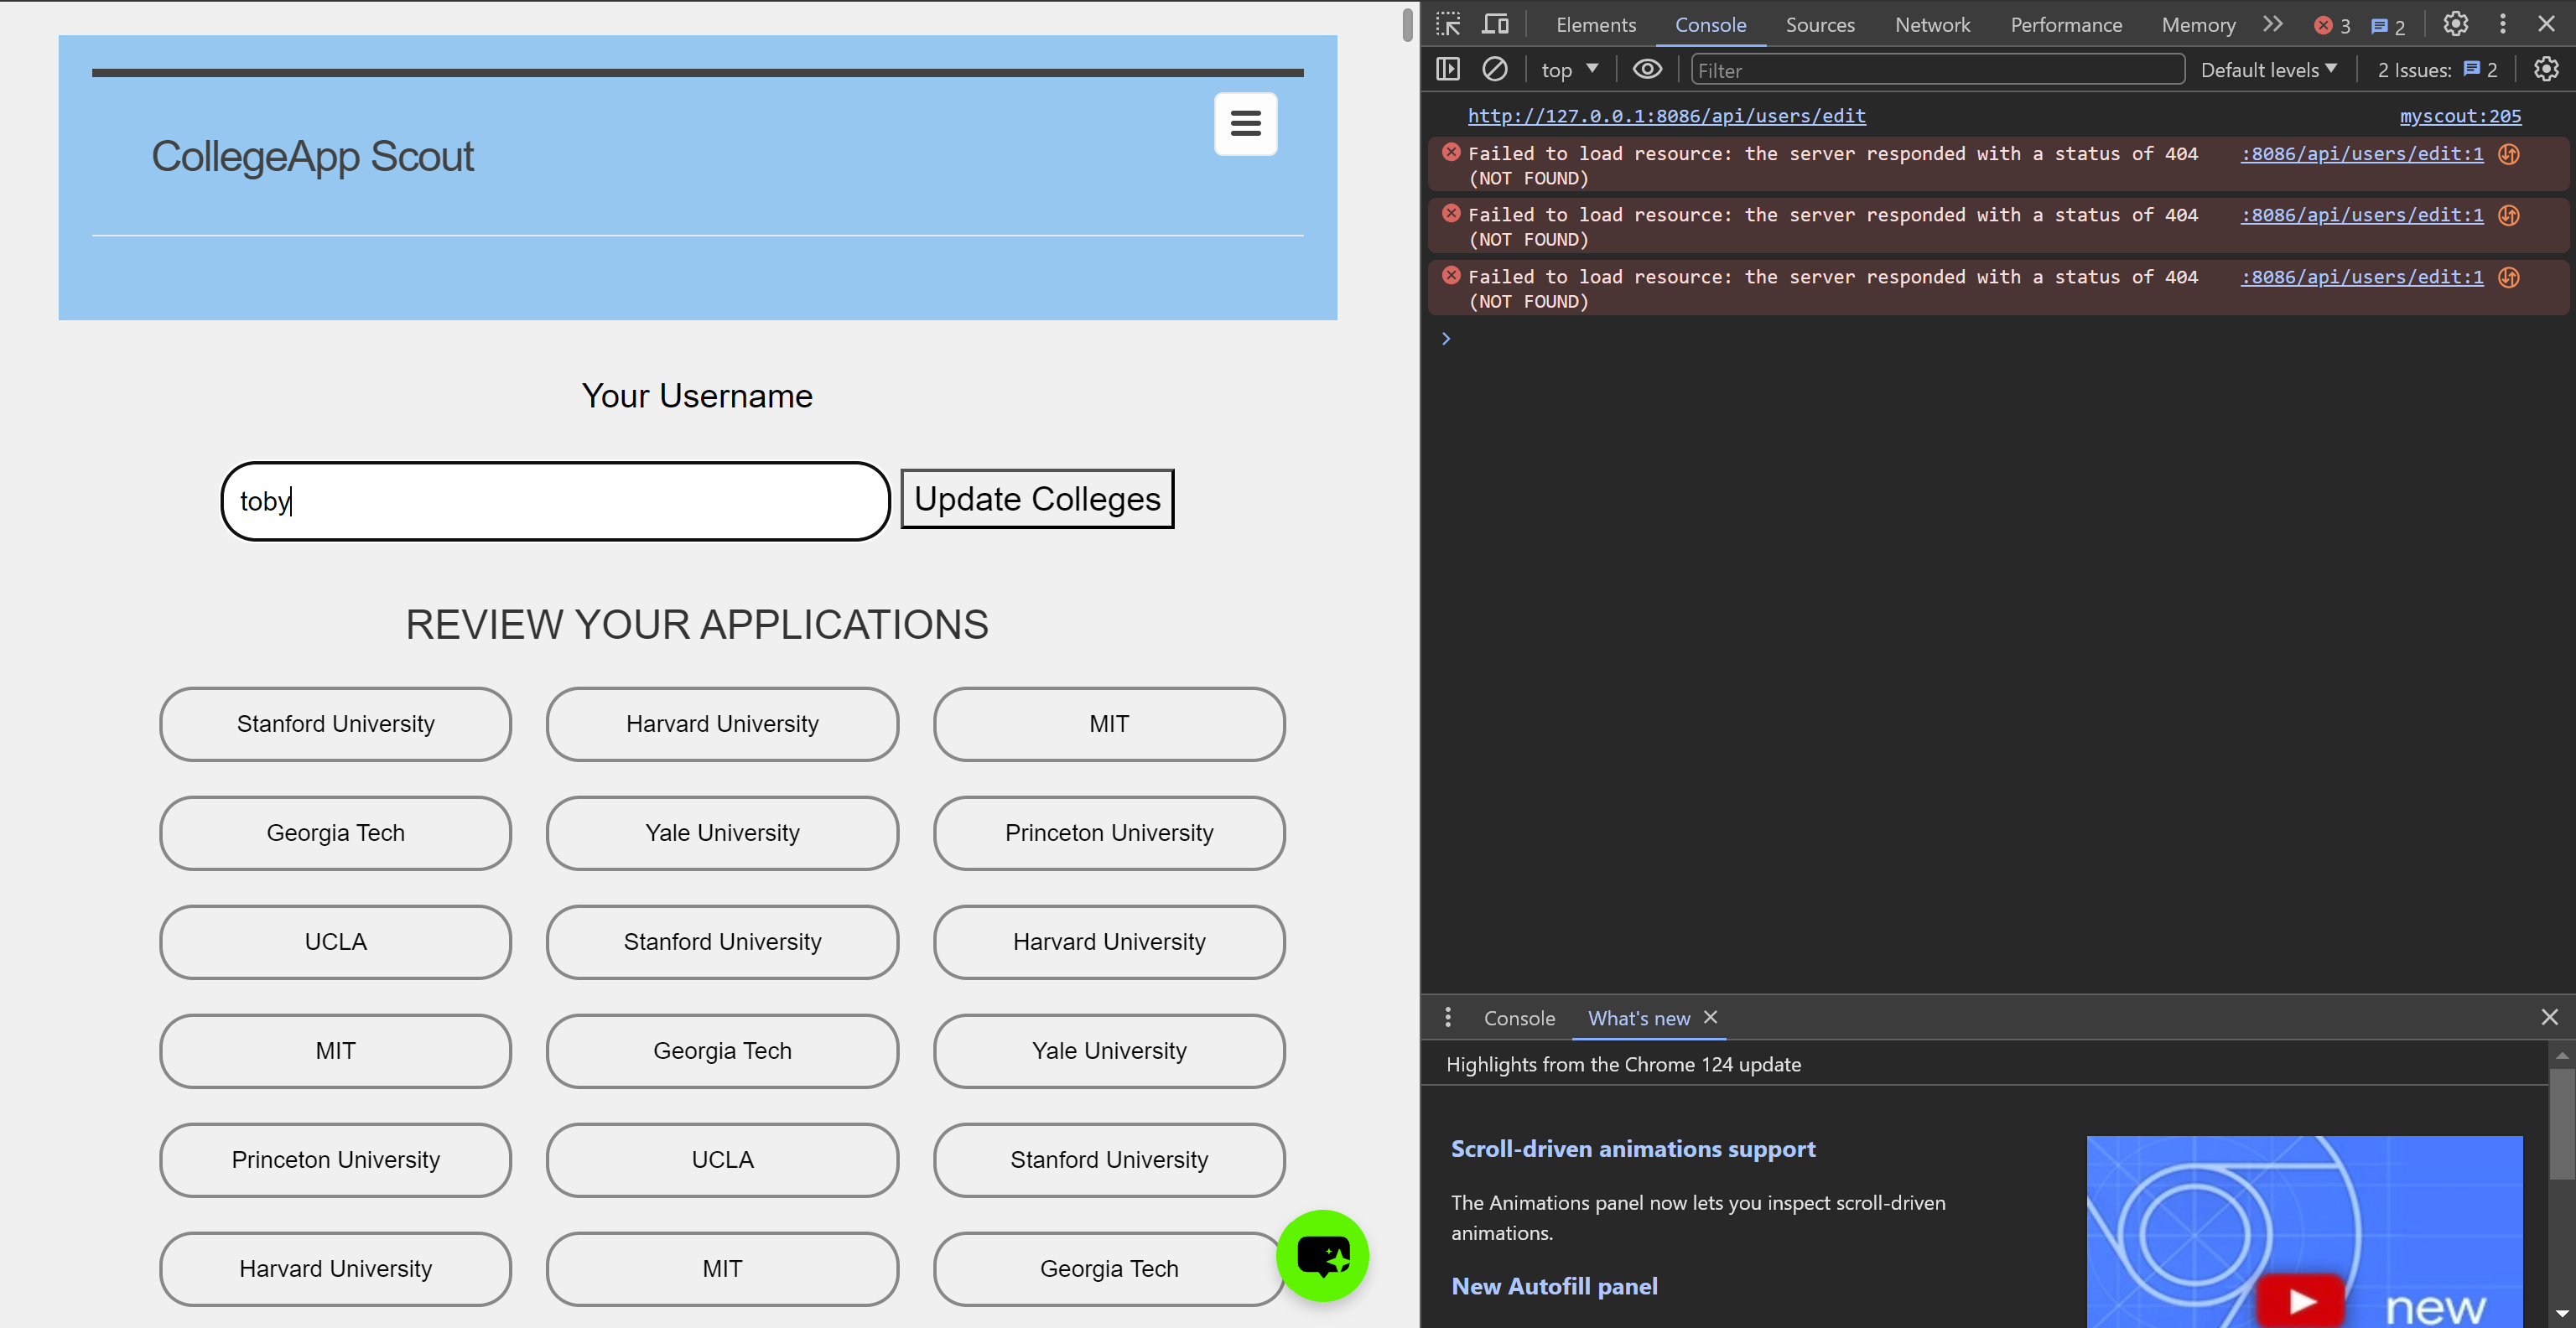
Show a demo (POST or UPDATE) gathering and sending input and receiving a response that show update. Repeat this demo showing both success and failure in the Chrome browser.
- This shows user toby’s selected college list:
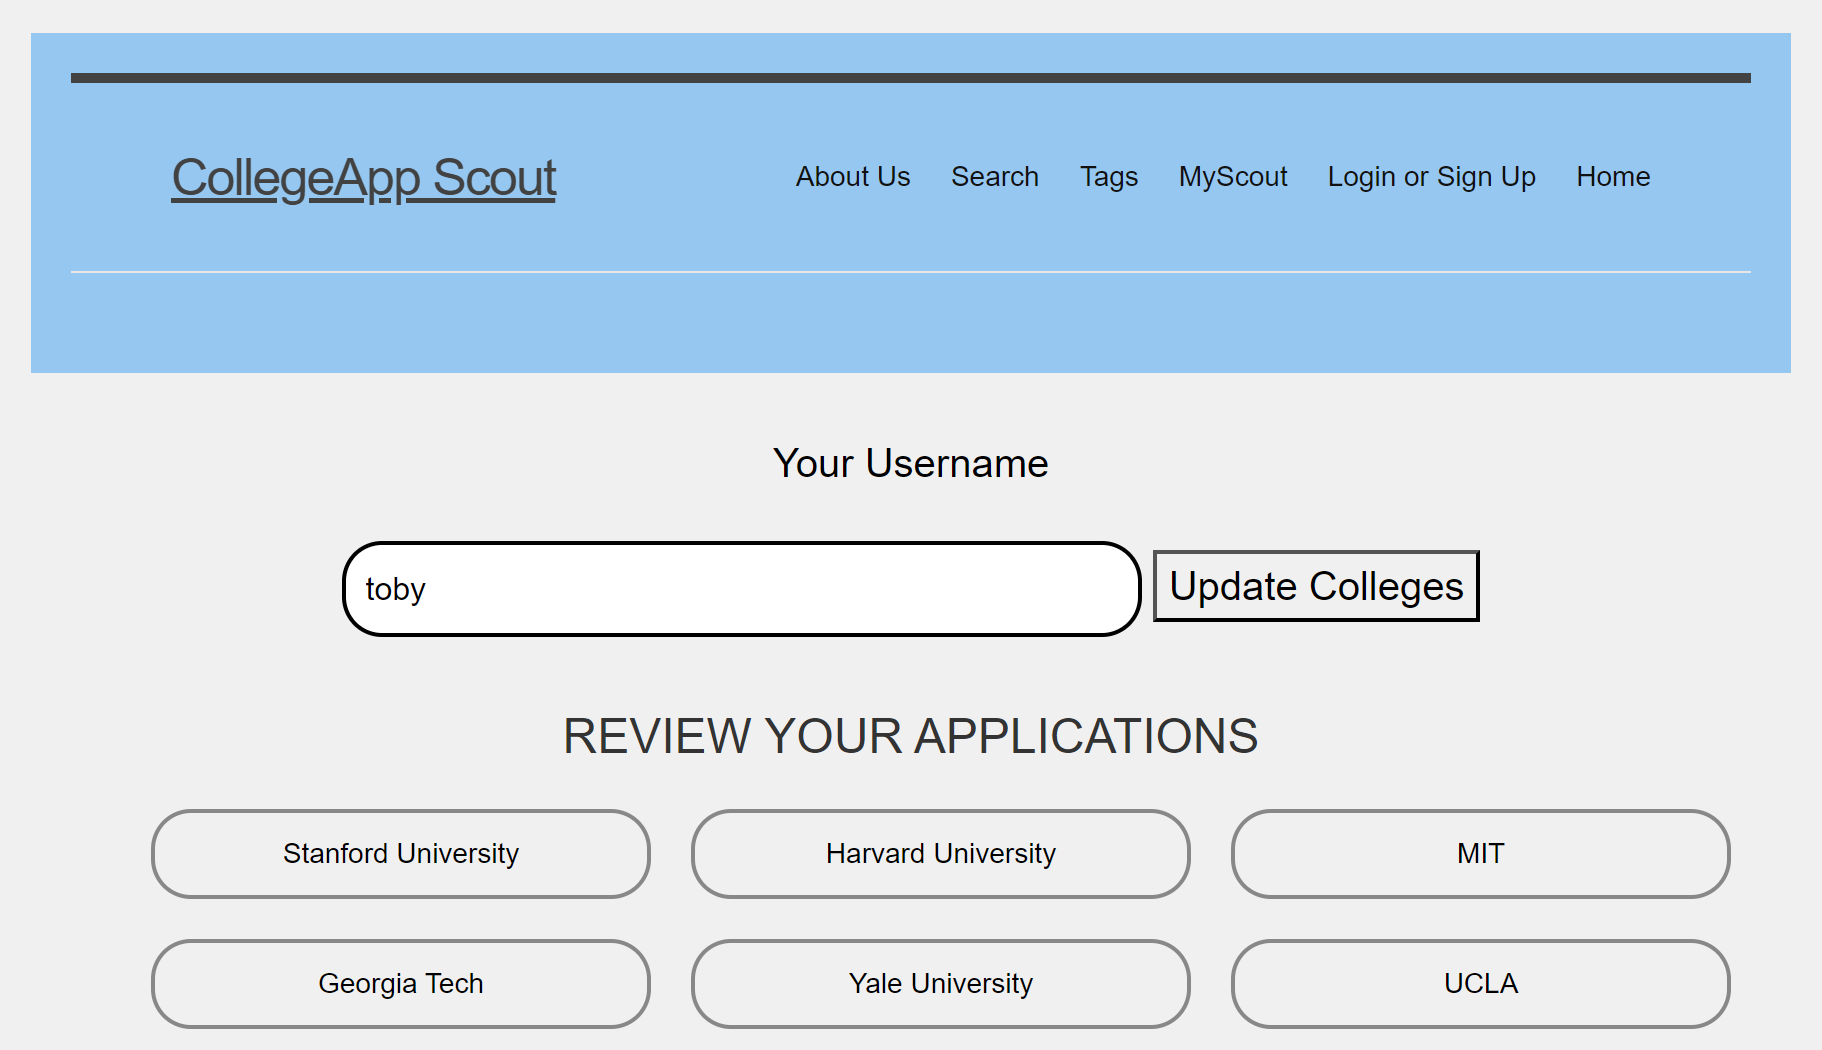
-
As seen, so far, the user has selected 6 colleges.
- Now, upon selecting additional colleges in the “FIND MORE COLLEGES” section jut below the “REVIEW YOUR APPLICATIONS” section, it is seen that the PUT method has succesfully edited the user’s college list. This change is seen under “REVIEW YOUR APPLICATIONS” once the change is made:
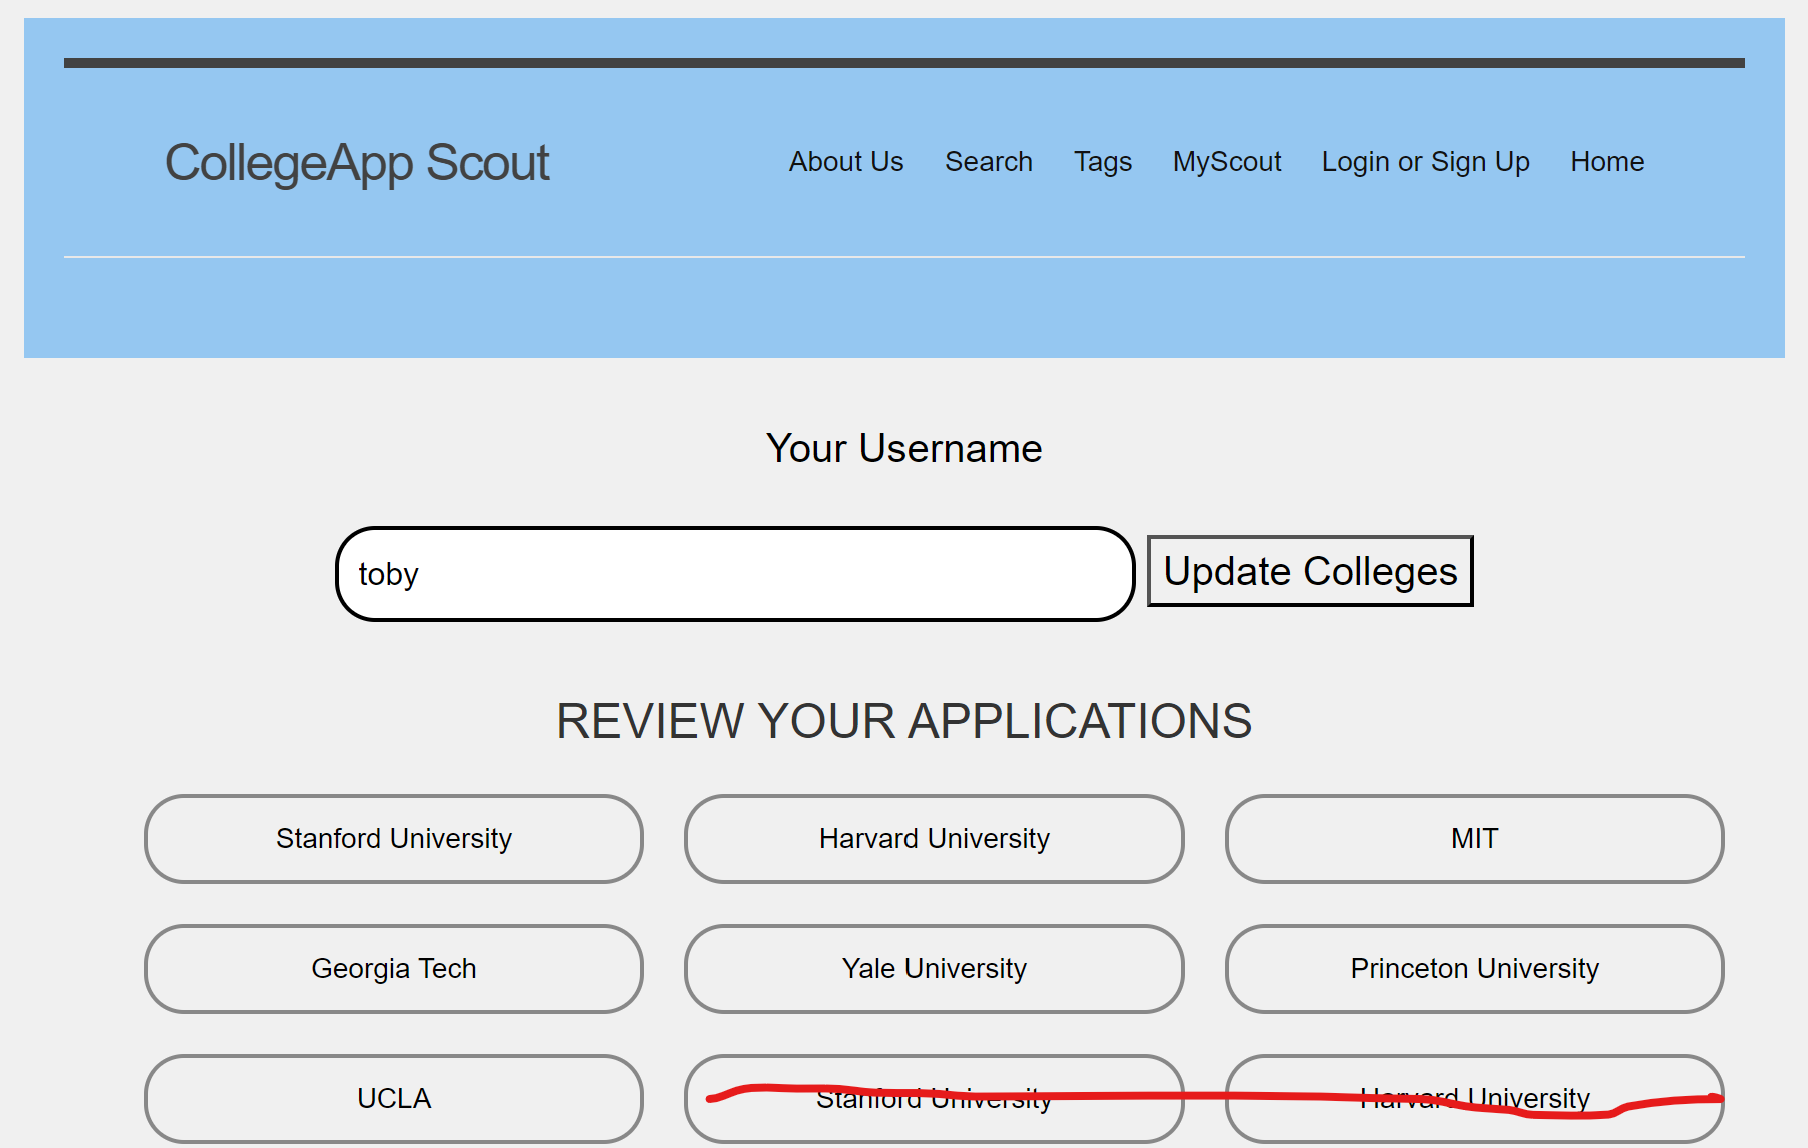
Success:
-
While there is a small duplication error in displaying selected colleges (crossed out colleges are repeating/duplicated), it is clear that the user “toby” has added Princeton University to his list of colleges. The addition is clearly seen in the screenshots directly above, proving the success of the PUT method.
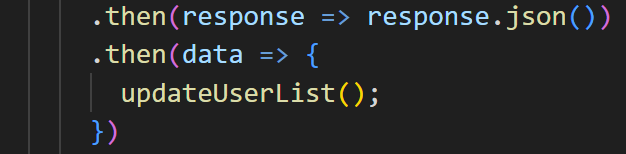
-
This is also how the Chrome broswer displays success: a change in the list of selected applications to be reviewed changes from user to user. An addition to this list after a user selects another college is a sign of success. The code that handles success is seen below:
Failure:
- The response to failure is seen in the Chrome browser below:
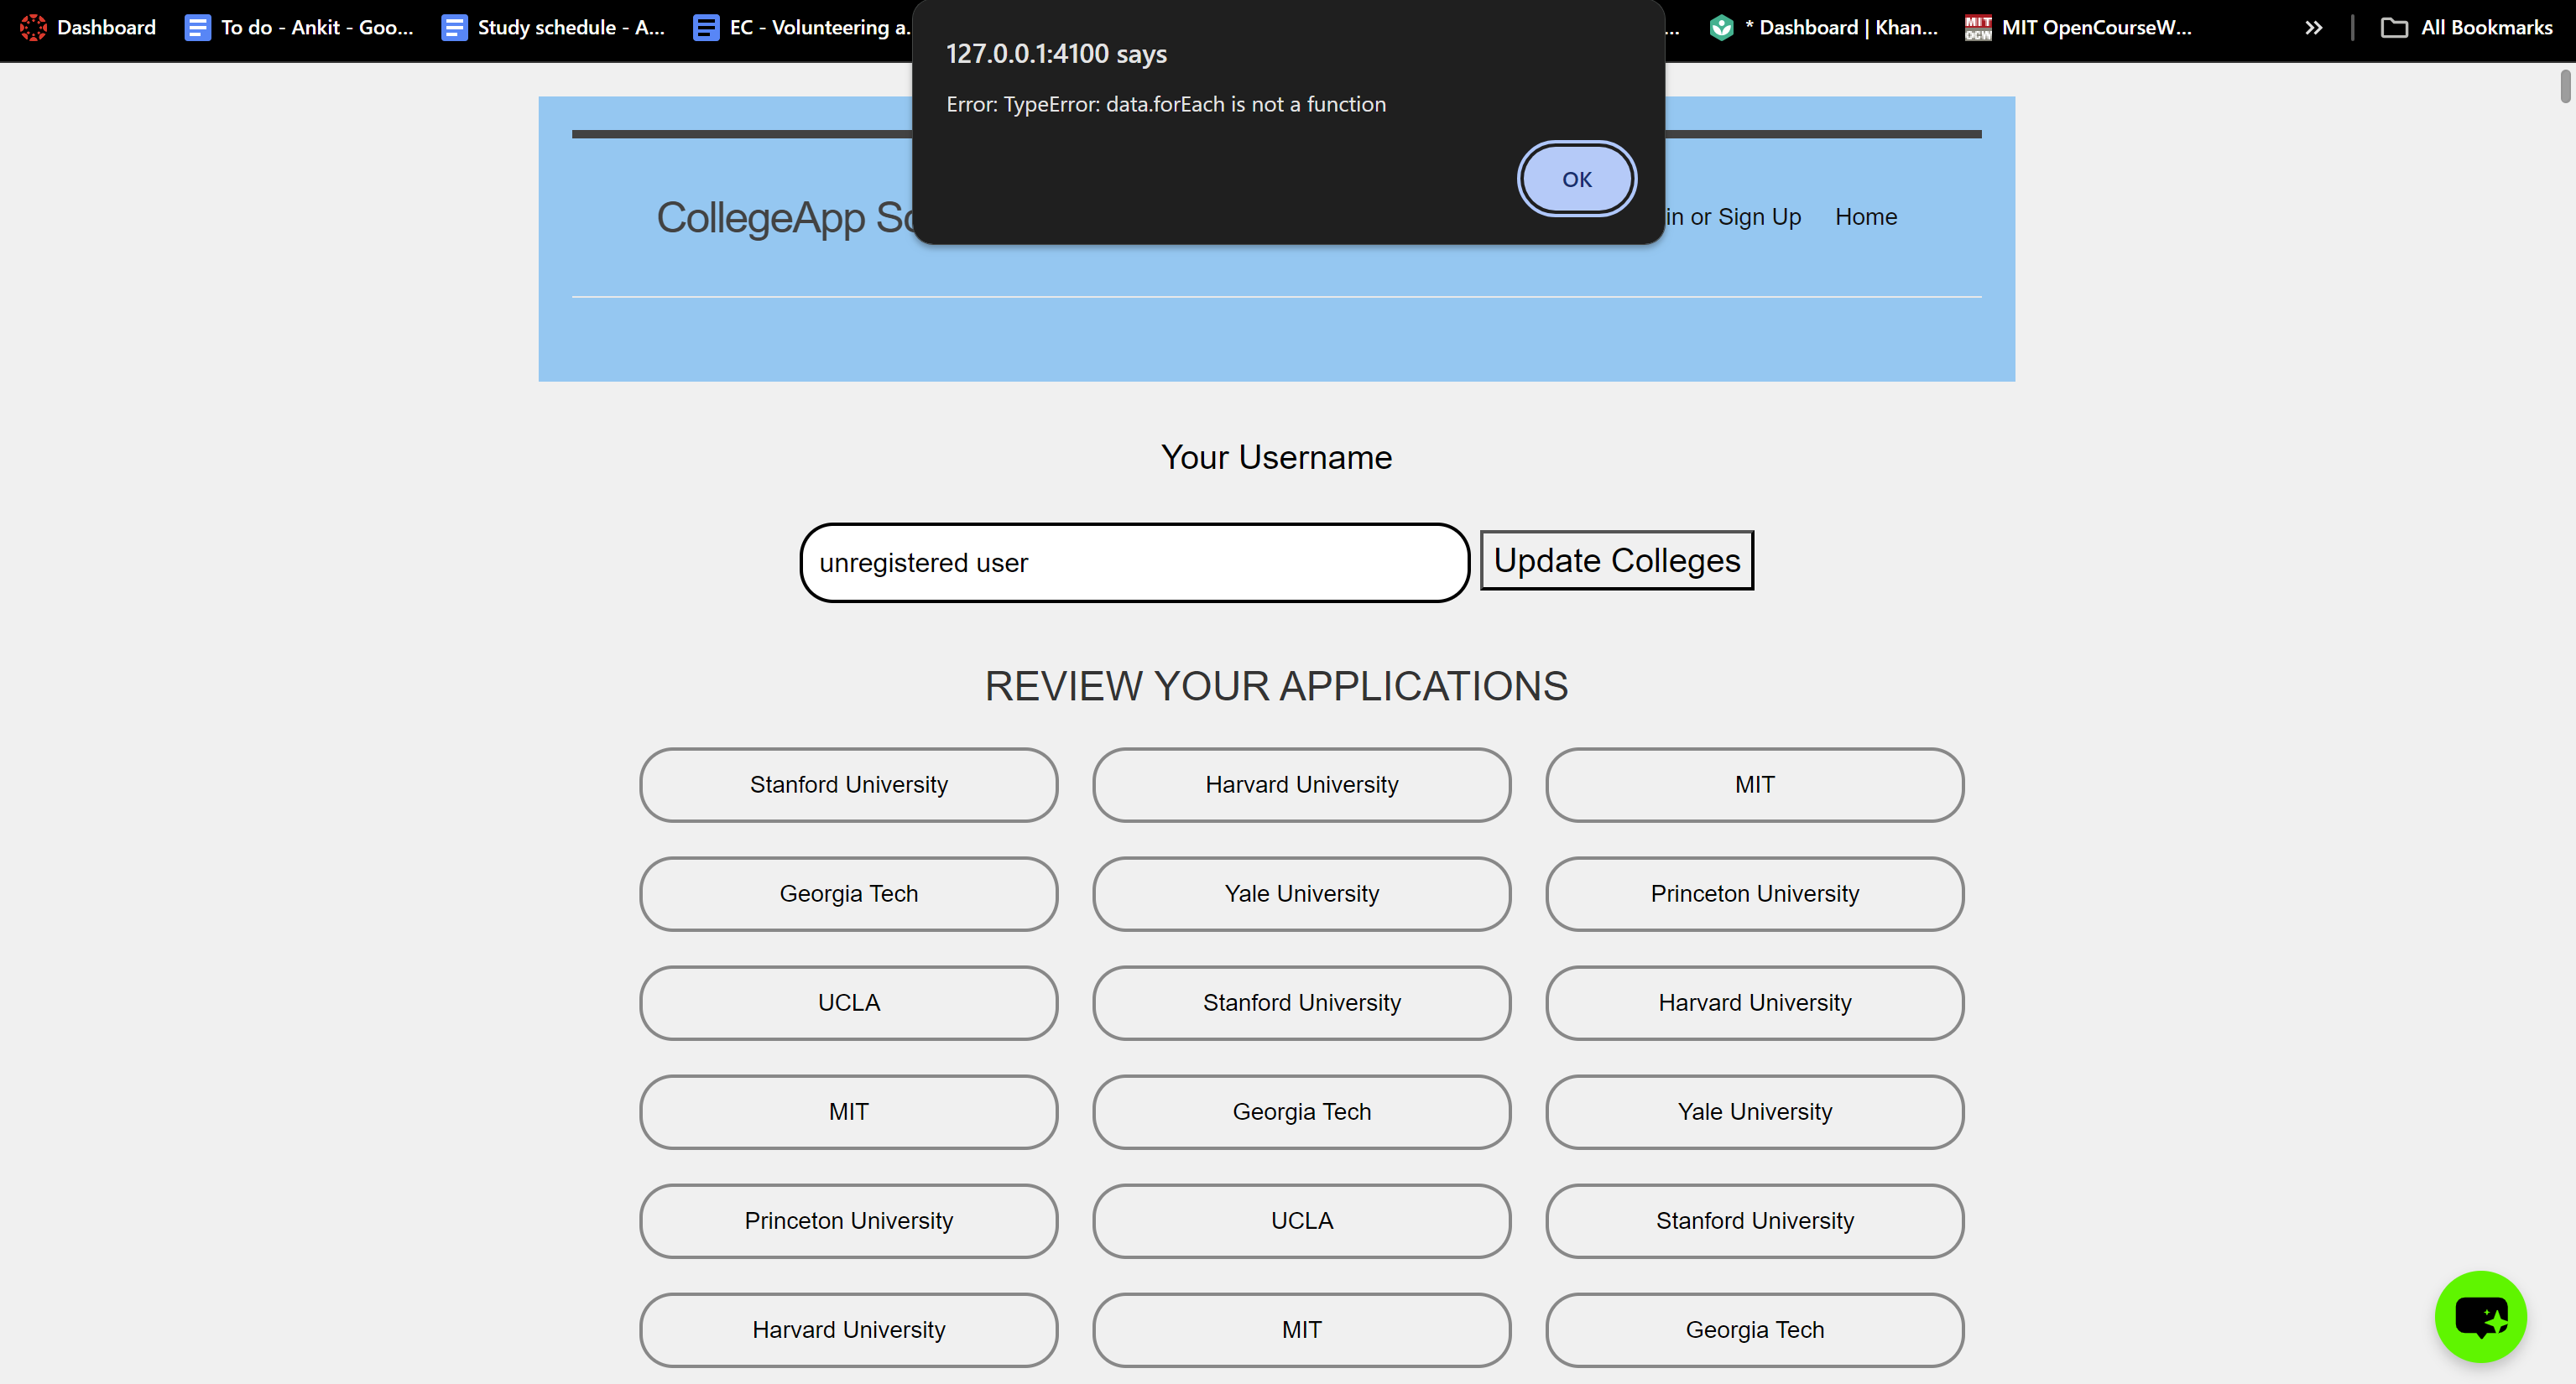
- As seen, there is an error because the user is not recognized or does not exist. The code that handles this error message due to failure is seen below:

Optional/Extra, ML Algorithm Analysis
Machine Learning Algorithm Analysis
- Show algorithms and preparation of data for analysis. This includes cleaning, encoding, and one-hot encoding.
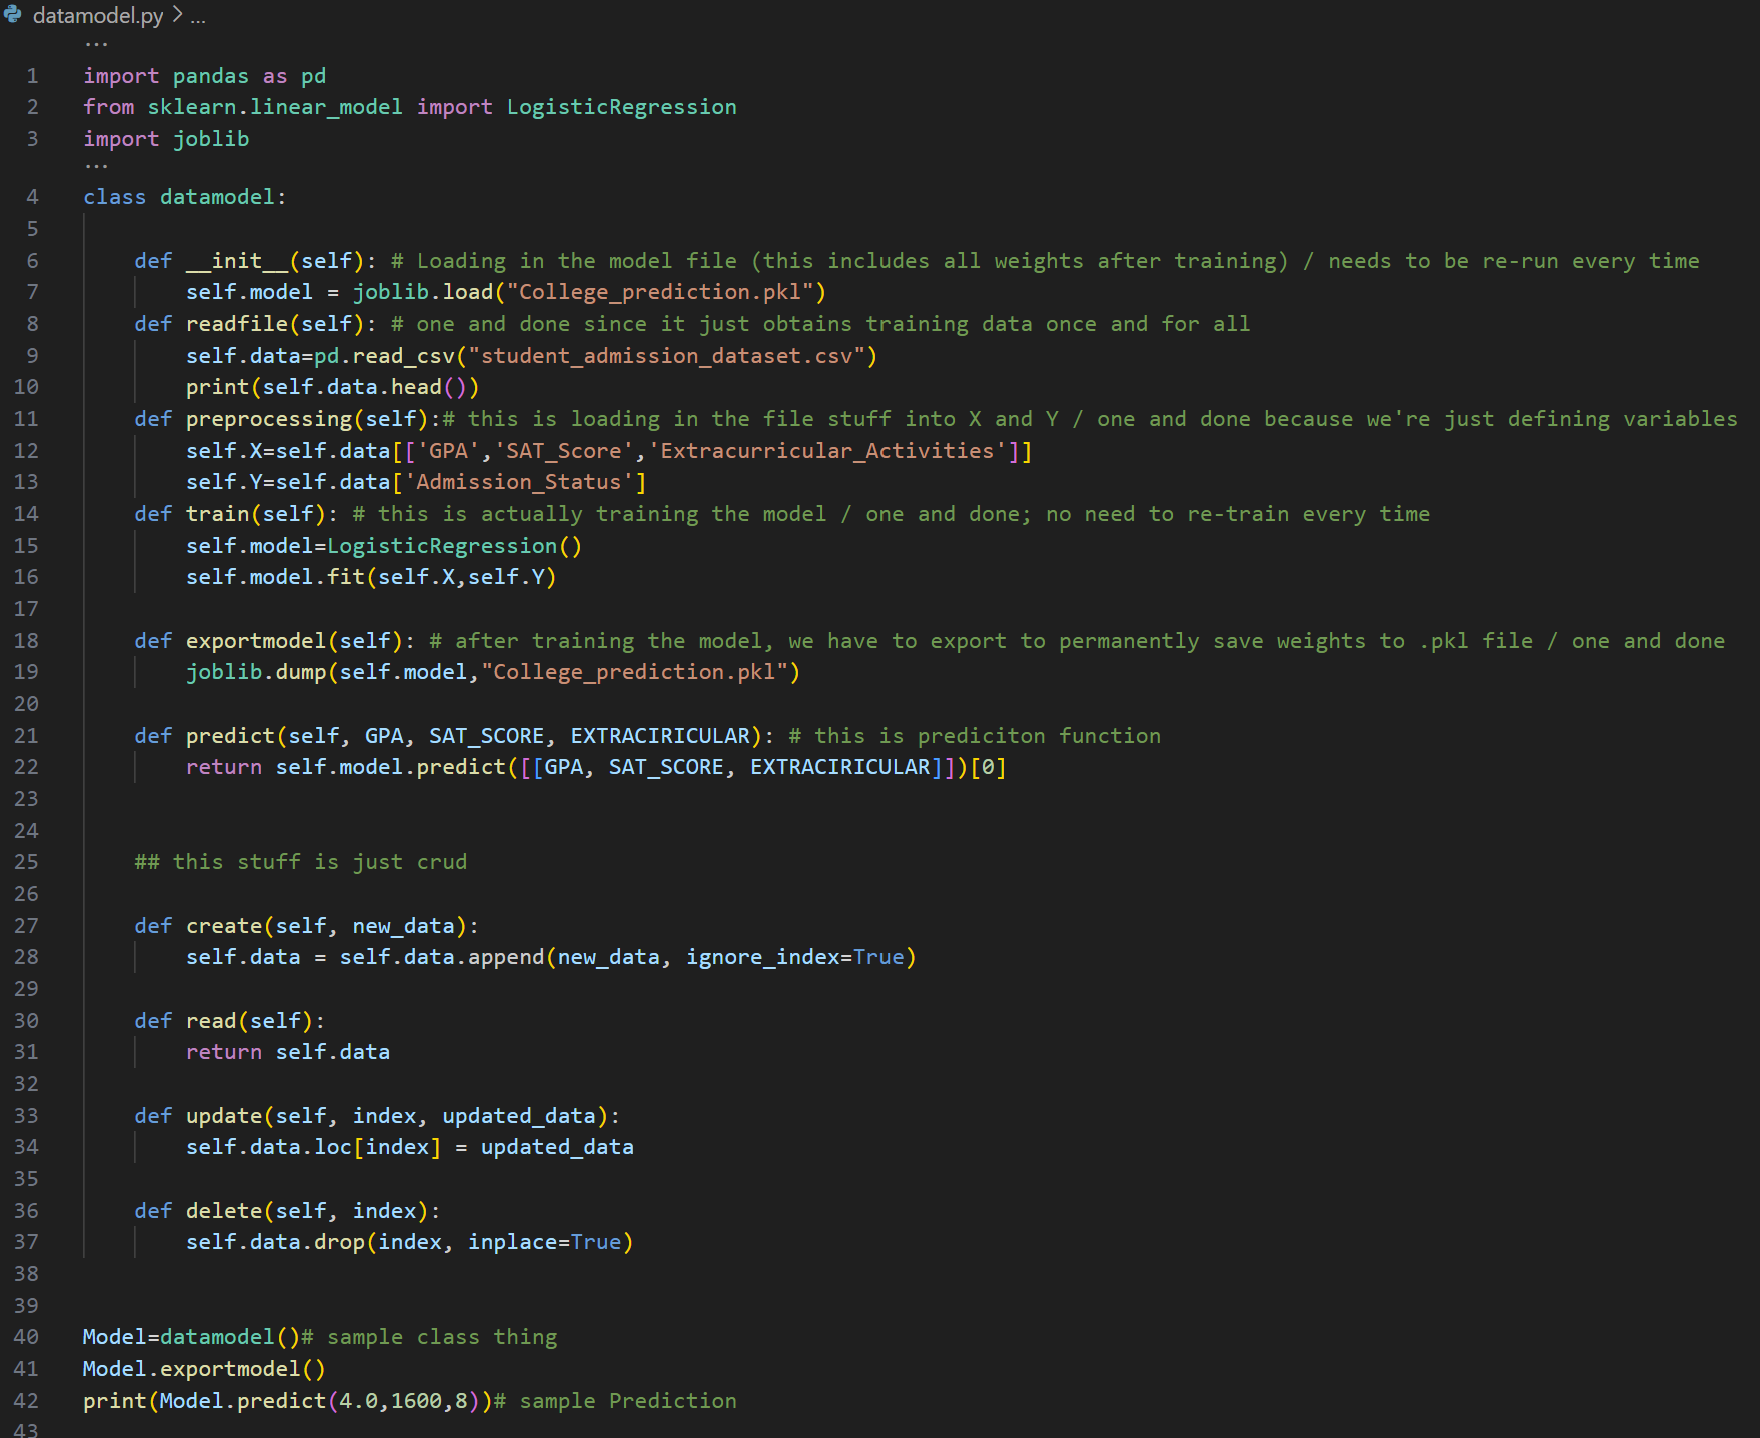
- The code above represents a linear regression machine learning prediction model for college acceptance. The dataset is in a
.csvfile, as seen below: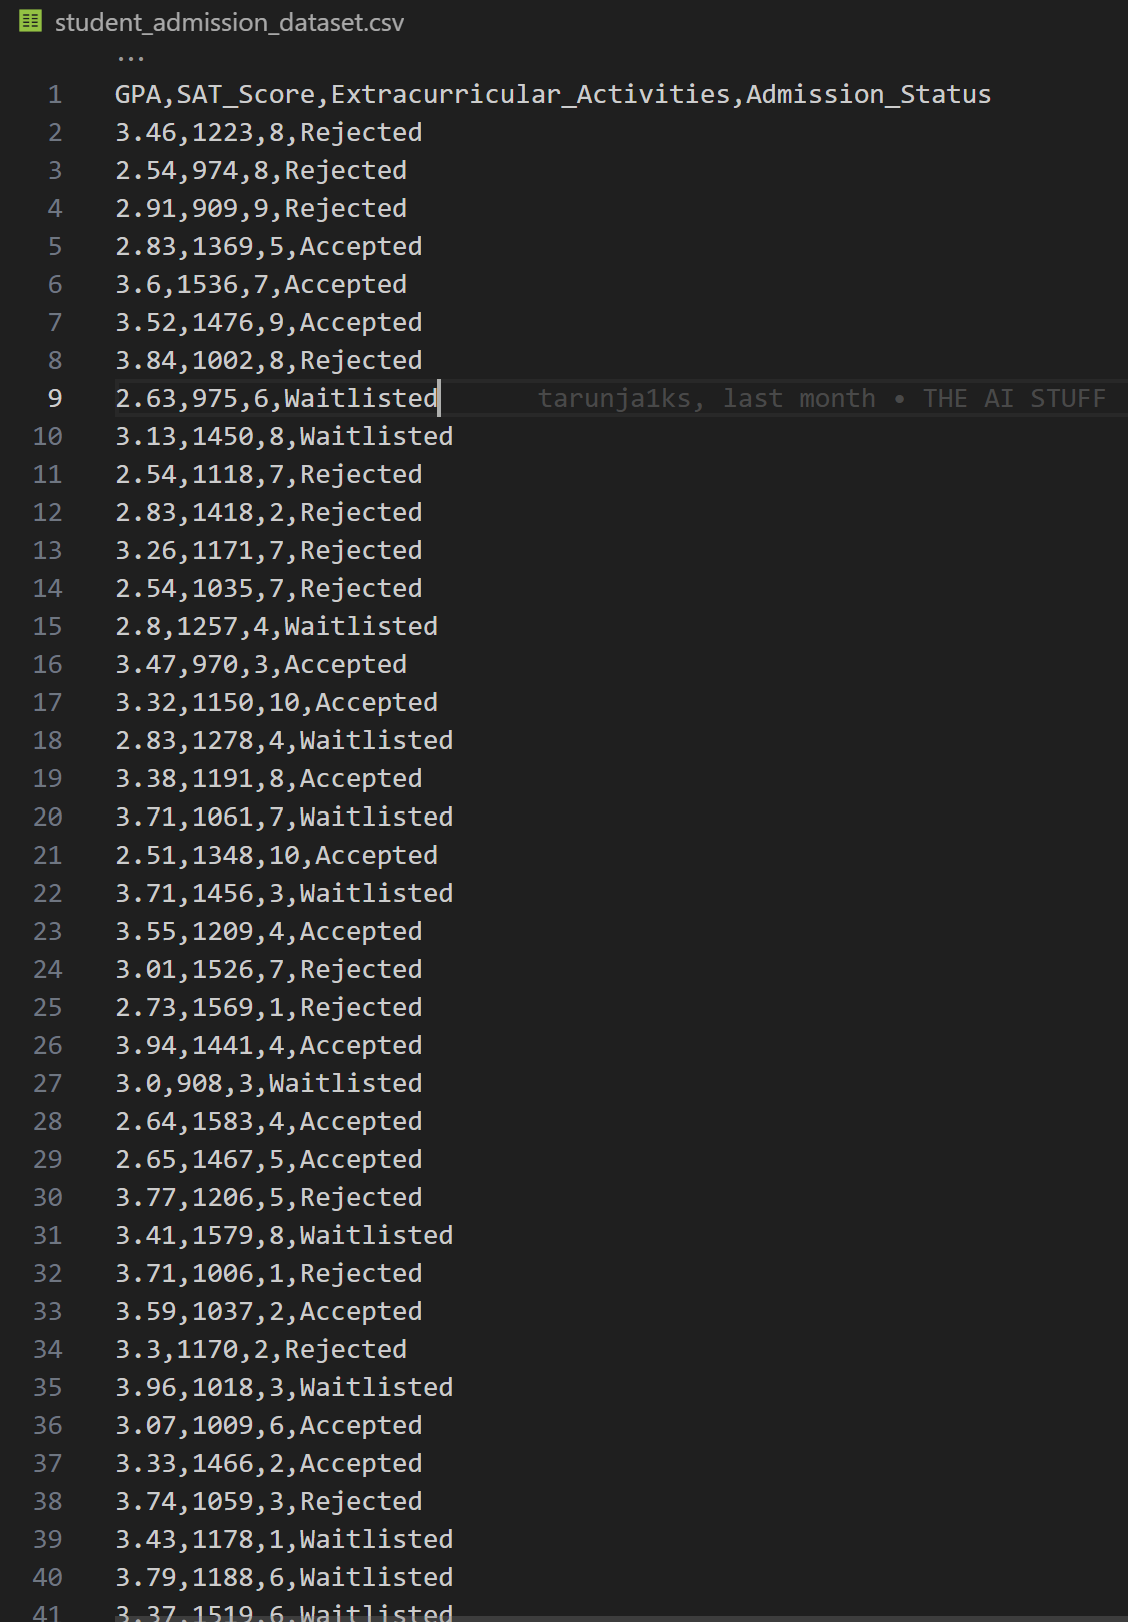
-
There are 251 individual data points in this file.
- Show algorithms and preparation for predictions.
-
The prediction preparations are a one-and-done process, as the predictions weights are saved permanently to a
.pklfile, which is called upon every time the prediction algorithm is run. In doing so, there is an increased efficiency as training weights don’t have to be re-calculated every time the model prepares for a prediction. The code for this is as seen below:
- Discuss concepts and understanding of Linear Regression algorithms.
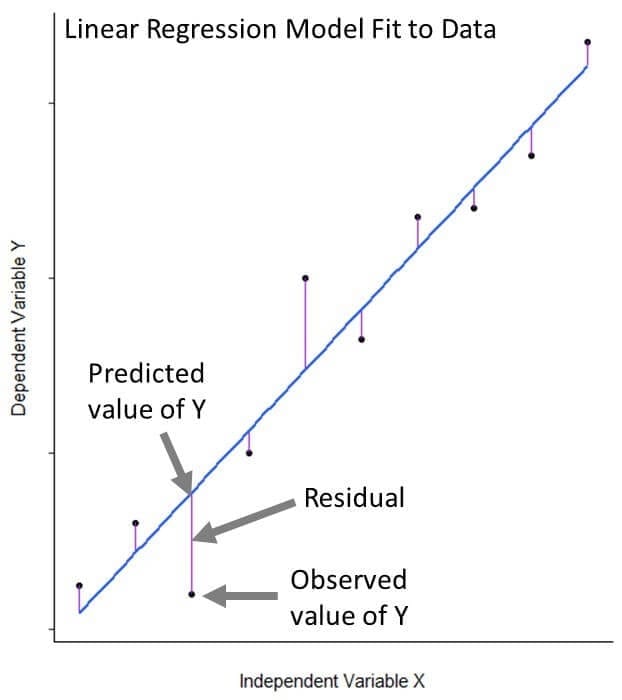
- Linear regression is a simple prediction algorithm used for predicting a continuous target variable based on one or more input features. In my case, the input features are a student’s weighted GPA, SAT score, and number of extracurriculars. It assumes a linear relationship between the variables and aims to find the best-fitting straight line through the data points by minimizing the error between the predicted and actual values.
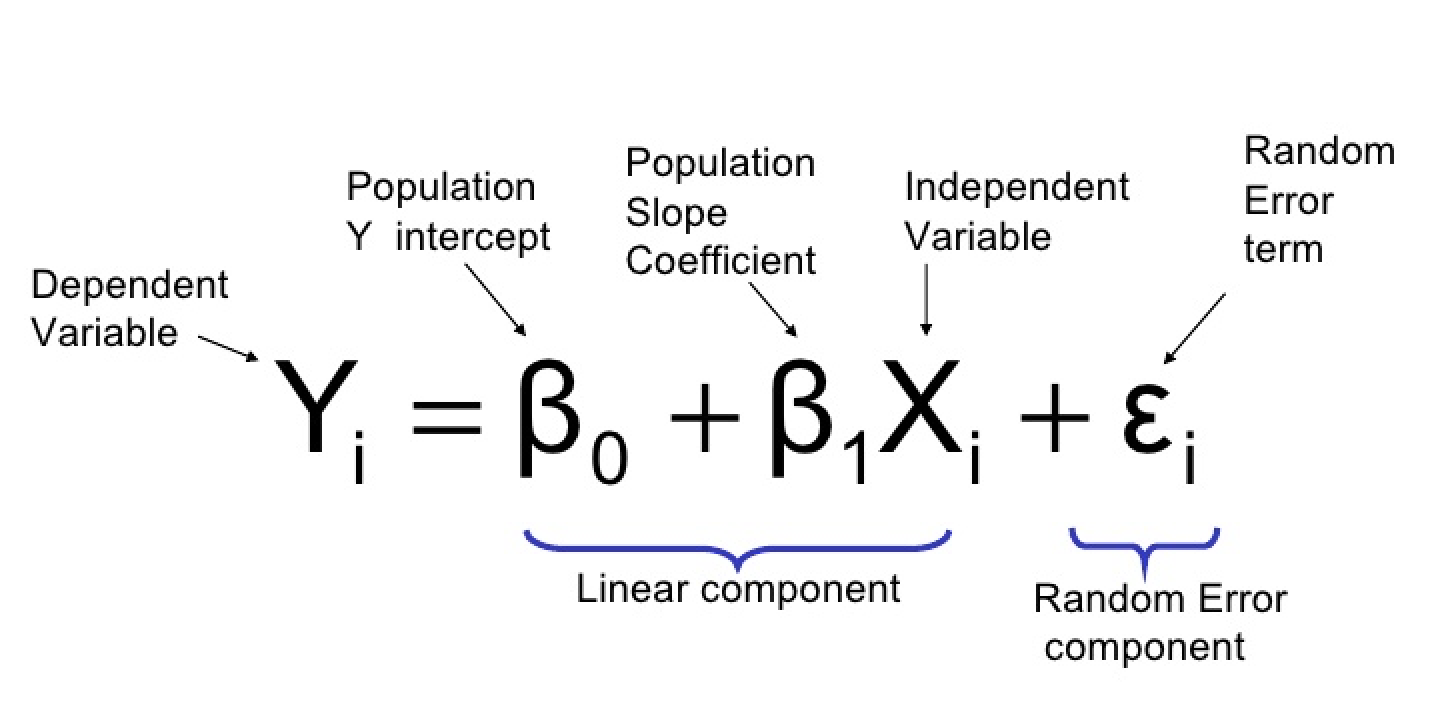
-
Mathematically, a linear regression prediction algorithm can be modeled using this function:
- Discuss concepts and understanding of Decision Tree analysis algorithms.
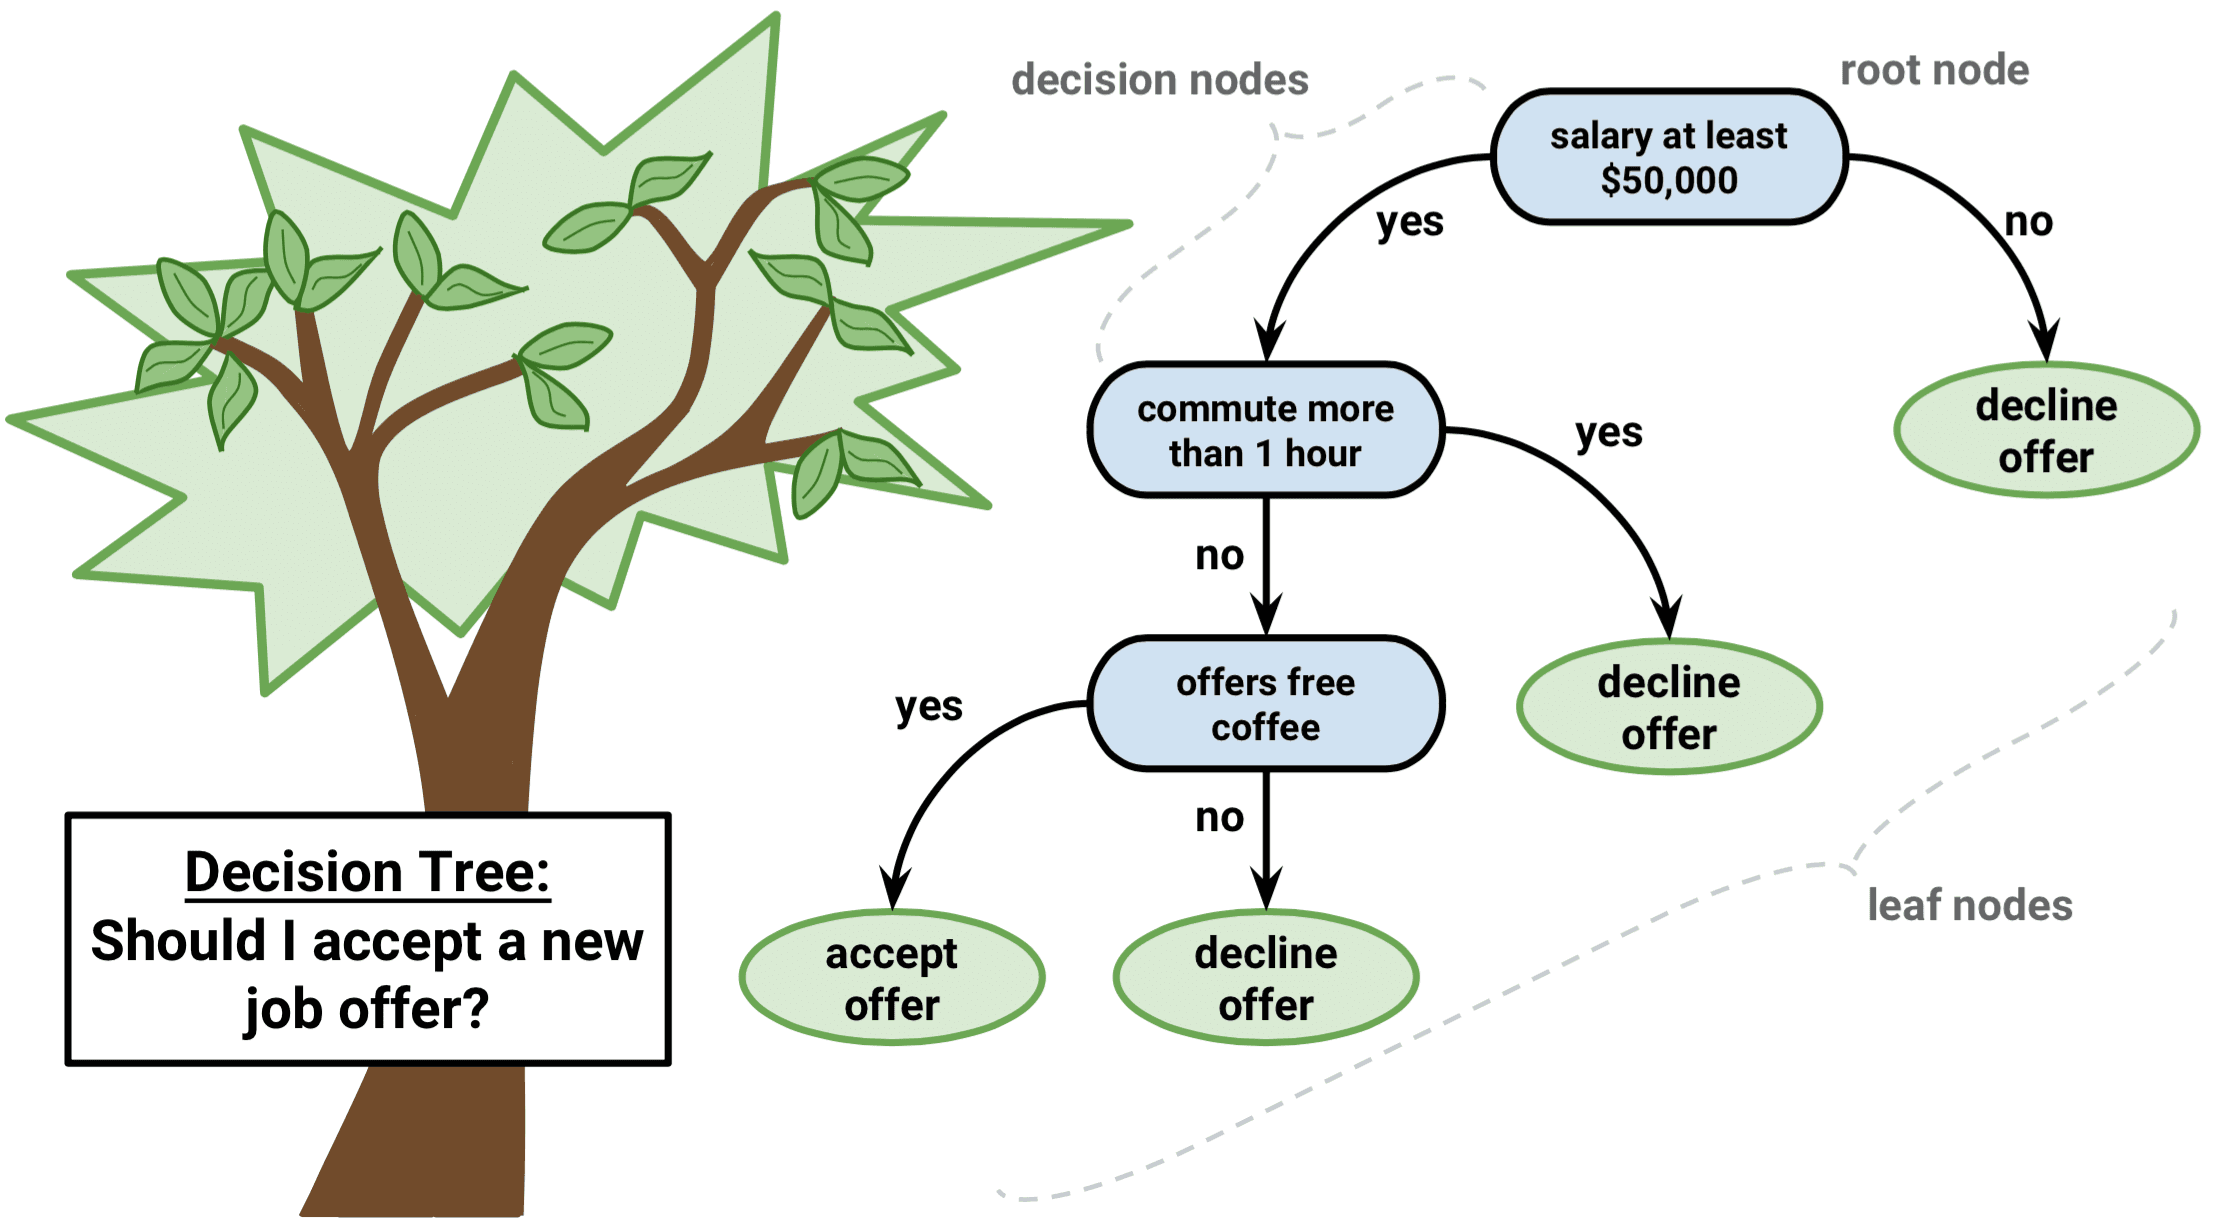
- Decision Tree analysis algorithms use a hierarchical tree structure to make decisions based on feature values, similar to a logic flowchart. The algorithm consists of different types of nodes, including the Root Node (representing the entire dataset), Internal Nodes (intermediate nodes that split the data based on feature conditions), and Leaf Nodes (terminal nodes representing the final decision or prediction). These nodes work by recursively splitting the dataset into subsets based on feature conditions to maximize the homogeneity or purity of the subsets regarding the target variable. Decision Trees are versatile and can handle both classification and regression tasks. The algorithm offers interpretability, making it easier to understand for beginners in data science and prediction algorithms. It can also capture non-linear relationships and allows for determining feature importance based on the number of times a feature is selected for splitting and the depth of the splits.